STM32F103VE上的ucos-ii_v2.86 + Stdperiph_lib_v3.4.0基于MDK
2020-01-04 18:44发布
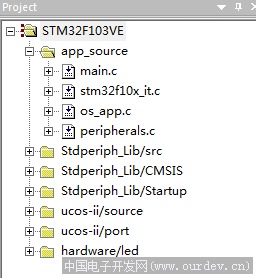
初学者没有什么好说的,只是将工程结构调整一下,再换成3.4.0的标准外设库。
使用一下wowbanui 的代码着 {MOD}功能,显示一下代码。这个ucos-ii只有两个最简单的任务。。。
/**
* @brief Main program.
* @param None
* @retval None
*/
int main(void)
{
/*!< At this stage the microcontroller clock setting is already configured,
this is done through SystemInit() function which is called from startup
file (startup_stm32f10x_xx.s) before to branch to application main.
To reconfigure the default setting of SystemInit() function, refer to
system_stm32f10x.c file
*/
INT8U os_err;
GPIO_Configuration ();
USART1_Configuration ();
OSInit();
/* Create the led task. */
os_err = OSTaskCreate((void (*) (void *)) App_Task_LED,
(void * ) 0,
(OS_STK * ) &App_Task_LED_Stk[APP_TASK_LED_STK_SIZE - 1],
(INT8U ) APP_TASK_LED_PRIO);
/* Create the key task. */
os_err = OSTaskCreate((void (*) (void *)) App_Task_KEY,
(void * ) 0,
(OS_STK * ) &App_Task_KEY_Stk[APP_TASK_KEY_STK_SIZE - 1],
(INT8U ) APP_TASK_KEY_PRIO);
OSStart ();
} /* end main */
/**
* @brief Application Task, LED Task.
* @param a pointer...
* @retval None
*/
void App_Task_LED (void* p_arg)
{
p_arg = p_arg;
if (SysTick_Config(SystemCoreClock / OS_TICKS_PER_SEC))
{
/* Capture error */
printf ("SysTick_Config Error! ");
for (;;);
}
for (;;)
{
led_on();
OSTimeDlyHMSM(0, 0, 0, 500);
led_off();
OSTimeDlyHMSM(0, 0, 0, 500);
}
}
/**
* @brief Application Task, KEY Task.
* @param a pointer...
* @retval None
*/
void App_Task_KEY (void* p_arg)
{
uint8_t key_current, key_previous;
p_arg = p_arg;
for (;;)
{
key_previous = key_current;
key_current = GPIO_ReadInputDataBit(KEY_PORT, KEY_PIN);
if ((key_previous == 1) && (key_current == 0))
usart_write_string ("KEY pressed! ");
OSTimeDlyHMSM (0, 0, 0, 50);
}
}

(MDK工程)
点击此处下载 ourdev_627603BI9MRB.rar(文件大小:21.24M) (原文件名:STM32F103VE_STRIVE.rar)
使用一下wowbanui 的代码着 {MOD}功能,显示一下代码。这个ucos-ii只有两个最简单的任务。。。
/**
* @brief Main program.
* @param None
* @retval None
*/
int main(void)
{
/*!< At this stage the microcontroller clock setting is already configured,
this is done through SystemInit() function which is called from startup
file (startup_stm32f10x_xx.s) before to branch to application main.
To reconfigure the default setting of SystemInit() function, refer to
system_stm32f10x.c file
*/
INT8U os_err;
GPIO_Configuration ();
USART1_Configuration ();
OSInit();
/* Create the led task. */
os_err = OSTaskCreate((void (*) (void *)) App_Task_LED,
(void * ) 0,
(OS_STK * ) &App_Task_LED_Stk[APP_TASK_LED_STK_SIZE - 1],
(INT8U ) APP_TASK_LED_PRIO);
/* Create the key task. */
os_err = OSTaskCreate((void (*) (void *)) App_Task_KEY,
(void * ) 0,
(OS_STK * ) &App_Task_KEY_Stk[APP_TASK_KEY_STK_SIZE - 1],
(INT8U ) APP_TASK_KEY_PRIO);
OSStart ();
} /* end main */
/**
* @brief Application Task, LED Task.
* @param a pointer...
* @retval None
*/
void App_Task_LED (void* p_arg)
{
p_arg = p_arg;
if (SysTick_Config(SystemCoreClock / OS_TICKS_PER_SEC))
{
/* Capture error */
printf ("SysTick_Config Error! ");
for (;;);
}
for (;;)
{
led_on();
OSTimeDlyHMSM(0, 0, 0, 500);
led_off();
OSTimeDlyHMSM(0, 0, 0, 500);
}
}
/**
* @brief Application Task, KEY Task.
* @param a pointer...
* @retval None
*/
void App_Task_KEY (void* p_arg)
{
uint8_t key_current, key_previous;
p_arg = p_arg;
for (;;)
{
key_previous = key_current;
key_current = GPIO_ReadInputDataBit(KEY_PORT, KEY_PIN);
if ((key_previous == 1) && (key_current == 0))
usart_write_string ("KEY pressed! ");
OSTimeDlyHMSM (0, 0, 0, 50);
}
}

(MDK工程)
点击此处下载 ourdev_627603BI9MRB.rar(文件大小:21.24M) (原文件名:STM32F103VE_STRIVE.rar)
友情提示: 此问题已得到解决,问题已经关闭,关闭后问题禁止继续编辑,回答。
受益了,顶一个。
一周热门 更多>