{var%20f='http://v.t.sina.com.cn/share/share.php?appkey=1515056452',u=z||d.location,p=['&url=',e(u),'&title=',e(t||d.title),'&source=',e(r),'&sourceUrl=',e(l),'&content=',c||'gb2312','&pic=',e(p||'')].join('');function%20a(){if(!window.open([f,p].join(''),'mb',['toolbar=0,status=0,resizable=1,width=440,height=430,left=',(s.width-440)/2,',top=',(s.height-430)/2].join('')))u.href=[f,p].join('');};if(/Firefox/.test(navigator.userAgent))setTimeout(a,0);else%20a();})(screen,document,encodeURIComponent,'','','https://www.xiaopingtou.cn//data/attach/topic/topicKPo7gB.jpg', '推荐 faihung 的文章《嵌入式Linux NFS 文件服务器搭建(基于致远电子EasyARM-i.MX287A开发板)》','https://www.xiaopingtou.net/article-65965.html','页面编码gb2312|utf-8默认gb2312'));)
Target Board为致远电子EasyARM-i.MX287A开发板,Host Machine为Ubuntu-14.04.5-Desktop-amd64虚拟机,使用的虚拟机软件为VMware Workstation10.0.1。
1. 检查Virtual Host是否安装NFS services
在Virtual Host的终端中输入命令“dpkg -l|grep nfs”查看是否安装了NFS服务,若已经安装会列出如下所示的NFS客户端nfs-common和NFS服务器nfs-kernel-server。
2. 安装NFS服务 2.1 设置Virtual Host连接Internet Virtual Host的网络连接为桥接 。 将VMware桥接虚拟交换机VMnet0桥接到Physical Host已经连接Internet的网卡(这里桥接的是Physical Host笔记本无线网卡)。

设置Virtual Host的网络连接方法为“自动DHCP”。使用命令“ping -c 3 www.baidu.com”测试Virtual Host已经连接Internet。
 4. 启动NFS服务
在Virtual Host 的终端中使用命令“/etc/init.d/nfs-kernel-server start”或“/etc/init.d/nfs-kernel-server restart”或者重启Virtual Host 来启动NFS服务器。
4. 启动NFS服务
在Virtual Host 的终端中使用命令“/etc/init.d/nfs-kernel-server start”或“/etc/init.d/nfs-kernel-server restart”或者重启Virtual Host 来启动NFS服务器。
 5. 在Virtual Host上测试NFS服务
在Virtual Host 的终端中输入“cd /home/nfs”进入NFS服务的共享目录,然后输入命令“mkdir a b c d”在NFS服务的共享目录下创建a、b、c、d四个空目录,使用“mkdir -p /mnt/nfs_test”命令创建NFS服务的共享目录的测试挂载点目录,这时使用命令“ls
/mnt/nfs_test”查看挂载点目录为空。在Virtual Host 的终端中输入“ifconfig eth0 ”查看Virtual Host 的IP地址(当前Virtual
Host 的IP为192.168.1.110)。在Virtual Host的终端中输入命令“mount -t nfs 192.168.1.110:/home/nfs /mnt/nfs_test -o nolock” ,将Virtual Host 上NFS服务共享的目录挂载到Virtual
Host 的测试挂载点/mnt/nfs_test上,这时使用命令“ls /mnt/nfs_test”查看挂载点目录,内容与/home/nfs相同。
5. 在Virtual Host上测试NFS服务
在Virtual Host 的终端中输入“cd /home/nfs”进入NFS服务的共享目录,然后输入命令“mkdir a b c d”在NFS服务的共享目录下创建a、b、c、d四个空目录,使用“mkdir -p /mnt/nfs_test”命令创建NFS服务的共享目录的测试挂载点目录,这时使用命令“ls
/mnt/nfs_test”查看挂载点目录为空。在Virtual Host 的终端中输入“ifconfig eth0 ”查看Virtual Host 的IP地址(当前Virtual
Host 的IP为192.168.1.110)。在Virtual Host的终端中输入命令“mount -t nfs 192.168.1.110:/home/nfs /mnt/nfs_test -o nolock” ,将Virtual Host 上NFS服务共享的目录挂载到Virtual
Host 的测试挂载点/mnt/nfs_test上,这时使用命令“ls /mnt/nfs_test”查看挂载点目录,内容与/home/nfs相同。

6. 在Target Board上测试NFS服务。 6.1 制作交叉网线 交叉网线两端线序如下表所示。
6.2 连接Target Board与Virtual Host 分别使用交叉网线和USB转串口线连接Target Board和Physical Host。 将VMware桥接虚拟交换机VMnet0桥接到Physical Host的以太网卡上。
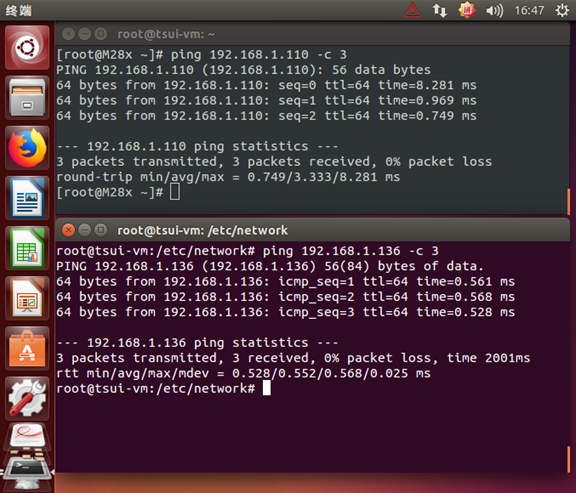
 设置Virtual Host的网络连接方法为“手动”,IP为192.168.1.110,Mask为255.255.255.0。使用ping命令测试双向连通性。

 6.2 在Target Board上测试NFS服务
在Virtual Host的终端上使用命令“touch /home/nfs/readme.txt”在Virtual Host的NFS服务共享目录中创建一个名为“readme.txt”的空文件。在Target Board的终端中输入命令“mount -t nfs 192.168.1.110:/home/nfs /mnt -o nolock”,将virtual Host上的NFS共享目录挂载到Target Board的/mnt上。在Target Board的/mnt/目录下可以看到readme.txt文件。
6.2 在Target Board上测试NFS服务
在Virtual Host的终端上使用命令“touch /home/nfs/readme.txt”在Virtual Host的NFS服务共享目录中创建一个名为“readme.txt”的空文件。在Target Board的终端中输入命令“mount -t nfs 192.168.1.110:/home/nfs /mnt -o nolock”,将virtual Host上的NFS共享目录挂载到Target Board的/mnt上。在Target Board的/mnt/目录下可以看到readme.txt文件。

# dpkg -l |grep nfs
ii  libnfsidmap2:amd64         0.25-5      amd64        NFS idmapping library
ii  nfs-common       1:1.2.8-6ubuntu1.2              amd64        NFS support files common to client and server
ii  nfs-kernel-server      1:1.2.8-6ubuntu1.2          amd64        support for NFS kernel server
2. 安装NFS服务 2.1 设置Virtual Host连接Internet Virtual Host的网络连接为桥接 。
将VMware桥接虚拟交换机VMnet0桥接到Physical Host已经连接Internet的网卡(这里桥接的是Physical Host笔记本无线网卡)。
设置Virtual Host的网络连接方法为“自动DHCP”。使用命令“ping -c 3 www.baidu.com”测试Virtual Host已经连接Internet。
# ping -c 3 www.baidu.com
PING www.a.shifen.com (111.13.100.92) 56(84) bytes of data.
64 bytes from 111.13.100.92: icmp_seq=1 ttl=51 time=28.3 ms
64 bytes from 111.13.100.92: icmp_seq=2 ttl=52 time=37.3 ms
64 bytes from 111.13.100.92: icmp_seq=3 ttl=51 time=26.7 ms

--- www.a.shifen.com ping statistics ---
3 packets transmitted, 3 received, 0% packet loss, time 2004ms
rtt min/avg/max/mdev = 26.738/30.807/37.306/4.645 ms
2.2 安装nfs-kernel-server和nfs-common
在Virtual Host的终端中输入命令“apt-get install nfs-kernel-serve”和“apt-get install nfs-common”。
#apt-get install nfs-kernel-serve
#apt-get install nfs-common
3. 创建NFS的共享目录
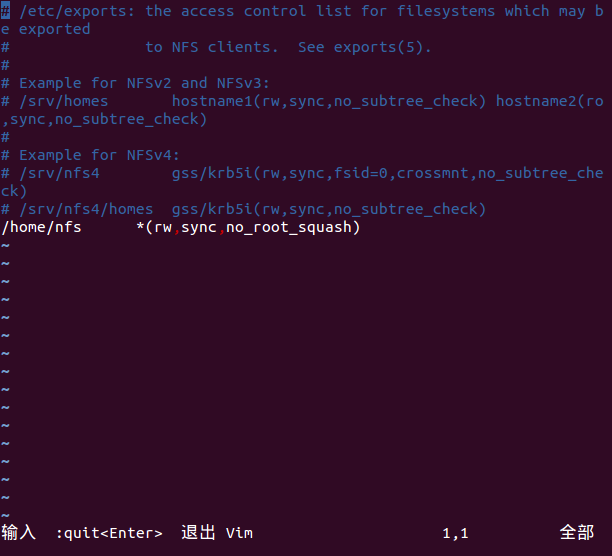
在Virtual Host 的终端中使用命令“mkdir -p /home/nfs”创建共享目录,使用命令“chmod 777 /home/nfs”给予所有用户对共享目录的读写执行的权限。使用vi编辑器打开/etc/exports文件。
#mkdir -p /home/nfs
#chmod 777 /home/nfs
#vi /etc/exports
在文件/etc/exports的末尾添加“/home/nfs *(rw,sync,no_root_squash)”内容,设备共享目录的共享属性。
4. 启动NFS服务
在Virtual Host 的终端中使用命令“/etc/init.d/nfs-kernel-server start”或“/etc/init.d/nfs-kernel-server restart”或者重启Virtual Host 来启动NFS服务器。
#/etc/init.d/nfs-kernel-server start    //方法一
#/etc/init.d/nfs-kernel-server restart  //方法二
#reboot  //方法三
在Virtual Host 的终端中使用命令“ps -aux|grep nfs”或“/etc/init.d/nfs status”查看NFS服务是否启动。
5. 在Virtual Host上测试NFS服务
在Virtual Host 的终端中输入“cd /home/nfs”进入NFS服务的共享目录,然后输入命令“mkdir a b c d”在NFS服务的共享目录下创建a、b、c、d四个空目录,使用“mkdir -p /mnt/nfs_test”命令创建NFS服务的共享目录的测试挂载点目录,这时使用命令“ls
/mnt/nfs_test”查看挂载点目录为空。在Virtual Host 的终端中输入“ifconfig eth0 ”查看Virtual Host 的IP地址(当前Virtual
Host 的IP为192.168.1.110)。在Virtual Host的终端中输入命令“mount -t nfs 192.168.1.110:/home/nfs /mnt/nfs_test -o nolock” ,将Virtual Host 上NFS服务共享的目录挂载到Virtual
Host 的测试挂载点/mnt/nfs_test上,这时使用命令“ls /mnt/nfs_test”查看挂载点目录,内容与/home/nfs相同。
6. 在Target Board上测试NFS服务。 6.1 制作交叉网线 交叉网线两端线序如下表所示。
6.2 连接Target Board与Virtual Host 分别使用交叉网线和USB转串口线连接Target Board和Physical Host。
将VMware桥接虚拟交换机VMnet0桥接到Physical Host的以太网卡上。
设置Virtual Host的网络连接方法为“手动”,IP为192.168.1.110,Mask为255.255.255.0。使用ping命令测试双向连通性。
6.2 在Target Board上测试NFS服务
在Virtual Host的终端上使用命令“touch /home/nfs/readme.txt”在Virtual Host的NFS服务共享目录中创建一个名为“readme.txt”的空文件。在Target Board的终端中输入命令“mount -t nfs 192.168.1.110:/home/nfs /mnt -o nolock”,将virtual Host上的NFS共享目录挂载到Target Board的/mnt上。在Target Board的/mnt/目录下可以看到readme.txt文件。