{var%20f='http://v.t.sina.com.cn/share/share.php?appkey=1515056452',u=z||d.location,p=['&url=',e(u),'&title=',e(t||d.title),'&source=',e(r),'&sourceUrl=',e(l),'&content=',c||'gb2312','&pic=',e(p||'')].join('');function%20a(){if(!window.open([f,p].join(''),'mb',['toolbar=0,status=0,resizable=1,width=440,height=430,left=',(s.width-440)/2,',top=',(s.height-430)/2].join('')))u.href=[f,p].join('');};if(/Firefox/.test(navigator.userAgent))setTimeout(a,0);else%20a();})(screen,document,encodeURIComponent,'','','https://www.xiaopingtou.cn//data/attach/topic/topicKPo7gB.jpg', '推荐 wenjb12345 的文章《Ubuntu-18.04 LTS嵌入式linux开发环境搭建》','https://www.xiaopingtou.net/article-69497.html','页面编码gb2312|utf-8默认gb2312'));)
ubuntu-18.04 LTS于 2018年4月26号正式发布,很多网友早就迫不及待下载下来安装了,同时也在博客分享了自己的安装体验,分desktop和server的文章,写得稍微简单了一些。本人这几个月一直在忙嵌入式AI ARM+VPU平台设计,没有及时去体验ubuntu-18.04 LTS,不过本人也得跟上步伐,因为本公司去年开发的DM8127平台最新版本的SDK3.9.1需要用到64bit虚拟机,正在玩的Intel Movidius Myriad 2 VPU,里面SDK包涉及到深度学习,用到比较新的Python编程,比如Caffe和GOOGLE的Tensorflow,都需要高版本的ubuntu来支持,所以这几天下载下来安装体验了一下。在体验过程中发觉有些地方需要注意的地方,所以决定写下来分享一下,让网友提出批评指正。还有本公司侧重嵌入式linux图像识别、机器视觉的开发(TI DM8127,海思Hi3516D,Hi3519平台),本人将从嵌入式linux的角度去写这个开发环境搭建,这一点和其他网友写的文章有比较大差别,希望对一些爱好嵌入式linux的朋友有所帮助。
一、 ubuntu-18.04 LTS简单介绍
ubuntu-18.04 LTS长期支持版本代号叫仿生海狸,使用linux kernel v4.15版本,
ubuntu-16.04 LTS 的Unity被取消,被ubuntu-18.04 LTS gnome取代,其他详细的优缺点可以看看其他网友的文章和官方的介绍。下载地址:https://www.ubuntu.com/download/alternative-downloads,

下面开始我们的搭建步骤,用图说话,有些步骤和本人写的《图像识别DM8127开发攻略——开发环境搭建》里面描述的ubuntu-16.04 LTS很类似,毕竟两个版本发布时间间隔不是很长。 二、 VMware-workstation-full-14.1.2安装(仅供学习参考)
我们一直使用VMware虚拟机,以前很多开发攻略文章都提到过,为了能够正常安装ubuntu-18.04 LTS,我们只能使用这个最新虚拟机版本,刚开始本人使用VMware-workstation-full-12.5.7,发觉安装不顺利,特别是安装到VMware tools共享文件夹的时候,失败了。然后本人就试试使用VMware-workstation-full-14.1.2来重新安装ubuntu-18.04 LTS,一切顺利。
点击安装VMware-workstation-full-14.1.2,如果电脑上面有旧版本的VM虚拟机,可以先卸载,再安装这个最新的VM虚拟机,这个并不影响你以前安装正在使用的那些ubuntu *.vmdk的开发环境,比如我们以前的Ubuntu16_dm8127.vmdk,是使用VMware-workstation-full-12.5.7安装的,现在安装好VMware-workstation-full-14.1.2同样可以使用,新版本VM肯定兼容以前的版本的东西。
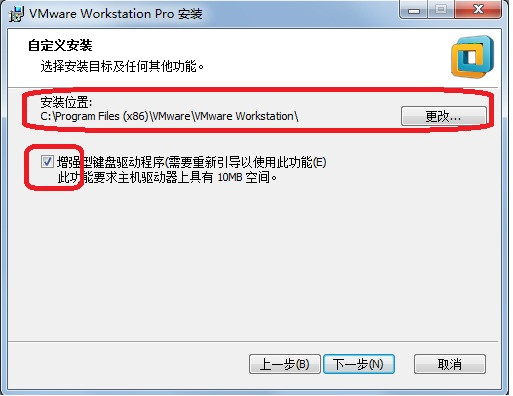
图-1
按图-1 选择好路径安装,比如一般放在D盘。

图-2
网上下载的版本最好不要去打钩。

图-3
安装完先不要急点击“完成”,应该使用“许可证”去处理。本人这里提供不了密钥,要的话自己网上查找,呵呵。输入密钥完成VMware-workstation-full-14.1.2安装后,先不要急马上去安装ubuntu18.04,我们需要先在WIN7下面网络属性进入属性配置界面。见下图,“共享”的地方选择VMware Network Adapter VMnet1,这样后面创建ubuntu18.04虚拟机的时候,使用桥接网口模式可以让虚拟机可以访问WIN7的共享文件夹等等。
图-4
然后重启一下电脑,再安装ubuntu-18.04 LTS,效果估计更好 三、 ubuntu-18.04 LTS安装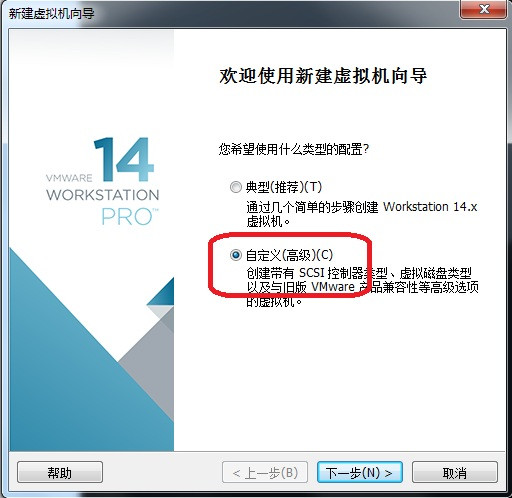
图-5
图-6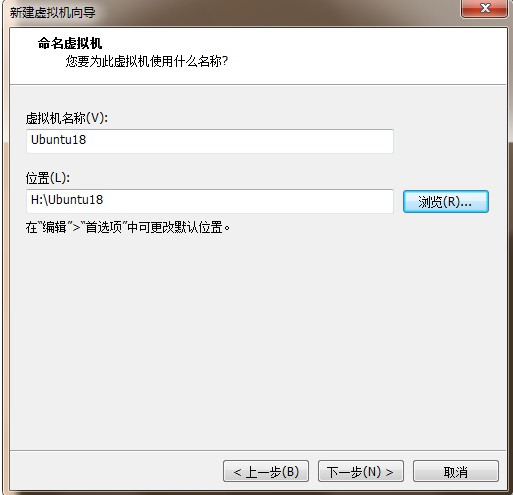
图-7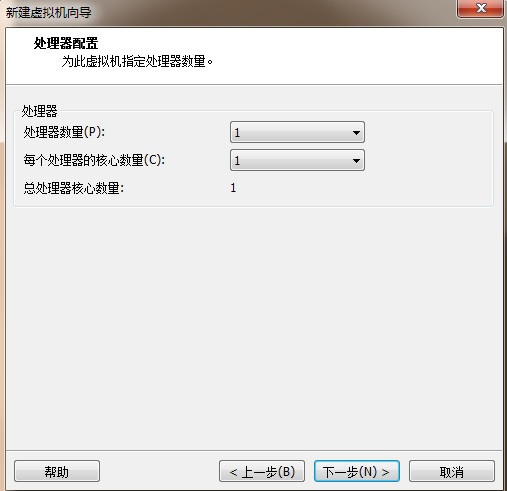
图-8
图-9
本公司开发部电脑基本都是8G内存以上,我们一般建议使用3G内存给虚拟机,最低要求是2G。
图-10
图-11
图-12
图-13
图-14
老话题,保存虚拟机单独一个文件,在WIN7下好管理,好压缩保存虚拟机进行备份。在WIN7下找一个比较大空间的分区,分至少50G空间给虚拟机,因为以后要装很多东西。
图-15
图-16
先点击“自定义硬件”,按图-17,图-18设置,再点击完成。
图-17
找到你下载好的ubuntu-18.04-desktop-amd64.iso镜像文件。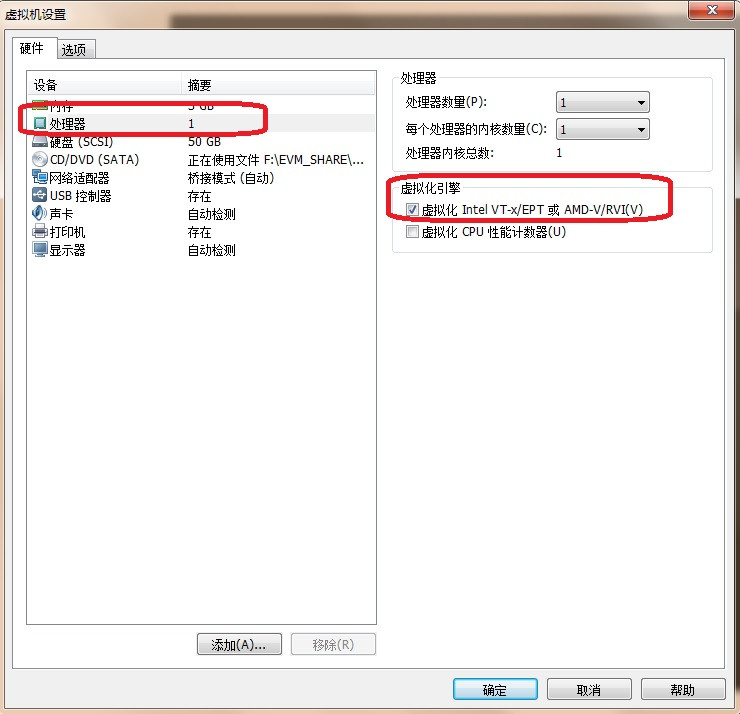
图-18
图-18选择这个虚拟化Intel VT-x/EPT,是保证后面开始安装ubuntu-18.04 64位操作系统,一开始安装不成功的问题,见图-20的显示。
图-19
图-20
图-21
如果在图-18选择了虚拟化Intel VT-x/EPT还解决不了ubuntu-18.04 64位操作系统安装问题,则需要在启动电脑的时候,进入BIOS去设置,见图-21的选择,保存退出BIOS,就OK了。
图-22
进入熟悉的安装界面,继续看图说话。
图-23
图-24
允许升级安装一些第3方的软件包。
图-25
图-26
图-27
图-28
公司重点在做嵌入式AI ARM+VPU的平台,我们取的普通用户名字就叫ubuntu18vpu吧。图-28 的名字定义会体现在下图vpu@ai-vpu:,见图-29

图-29
图-30
开始长时间安装ubuntu-18.04。
图-31
ubuntu-18.04安装结束后,先不要急重启虚拟机Restart Now,应该按图-31先断开虚拟机光盘的镜像连接,即不要再让虚拟机启动的时候继续运行ubuntu-18.04-desktop-amd64.iso文件。
图-32
最后重启虚拟机。 四、 对ubuntu-18.04 LTS构建良好的开发环境 1、 ubuntu-18.04 LTS支持普通用户登录
图-33

图-34
按上面步骤安装好ubuntu-18.04后,重启虚拟机,就进入图-33的普通用户登录界面(本人发觉这个登录时间有点慢,目前还没有时间去优化ubuntu-18.04的启动脚本,网上有人说是界面管理工具,负责系统启动图形显示的plymouth-read-write.service和plymouth-quit-wait.service就占用了50多秒,有的说是虚拟机里面的显卡驱动安装问题),点击普通用户账号,输入密码登录。
图-35
接下来我们先熟悉ubuntu-18.04 LTS的界面,左下角那9个点就是:Show Applications,点击它,熟悉它。特别是settings界面见图-35,先设置有线网络,保证能在ubuntu-18.04里面能上网,否则无法进行软件包升级。其他settings可以放到后面再优化。
图-36
在图-35的settings界面,我们点击Network里面的Wired,则会出现图-36的界面,输入熟悉的网络配置,为了通过我们公司路由接到外网,这个DNS必须根据你公司连接外网的路由器分配的DNS一致。网络设置好后,我们可以点击火狐浏览器打开网页测试一下,网络通了就可以做apt install这些操作了。 2、 ubuntu-18.04 LTS支持root登录 首先在普通用户登录的情况下,使用#sudo su,然后输入普通用户ubuntu18vpu的密码1234567,临时切换到root权限下操作。
先安装vim编辑器,#apt-get install 和#apt install命令是一样的。
#apt install vim
#apt install v p n c git (v p n c 竟然被屏蔽,注意没空格)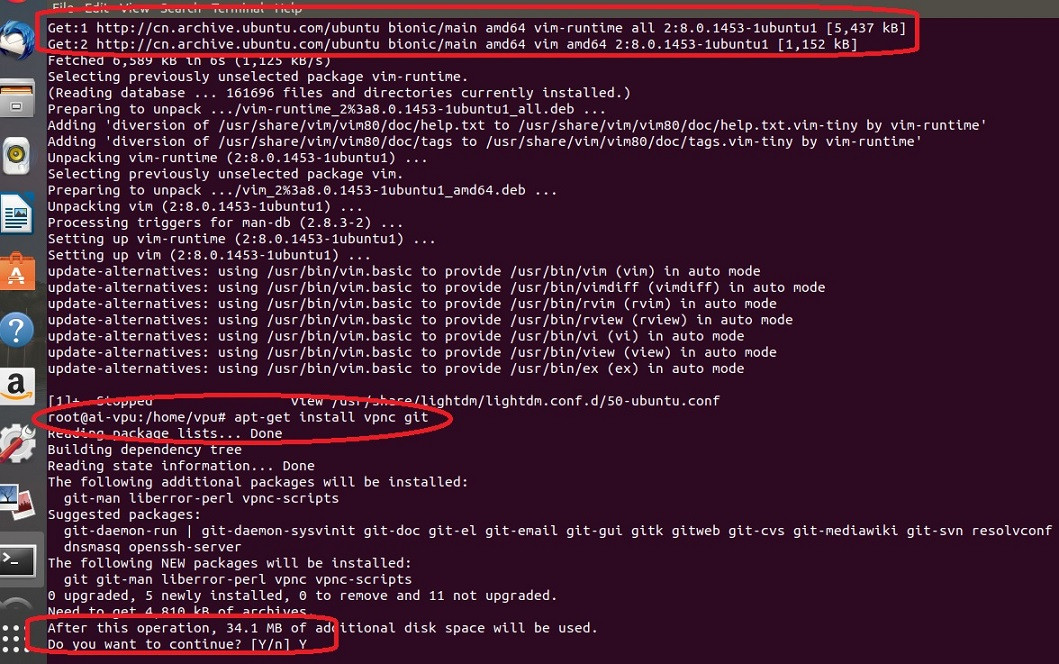
图-37
图-38
然后按图-38进入/etc/pam.d目录下,#vim gdm-autologin
图-39
按图-39修改屏蔽,然后保存文件退出。
图-40
按图-40修改,#vim gdm-password,保存退出。
图-41
使用#passwd root,添加root,并设置root的登录密码2次,我们使用简单的1234567密码,见图-41。
然后编辑/root/.profile文件,#vim /root/.profile
图-42
按图-42红框去修改,先屏蔽mesg n || true,然后后面添加:
tty –s && mesg n || true
保存退出。
重启虚拟机,进入下面的登录界面。
图-43

图-44

图-45
点击“ Not listed?”,去选择root登录,见图-43,图-44,图-45。
做linux嵌入式开发,我们喜欢使用root权限去操作,下面其他步骤也是在root的权限下去做的。
3、 ubuntu-18.04 LTS优化界面
我们回到图-35的settings界面,继续对ubuntu-18.04 LTS环境进行优化, 比如背景设置Background,设置电源Power关闭屏保等等,

图-46

图-47
设置显示设备模式,我们选择1280*800模式。刚开始看不完整个界面,可以按下图-48去操作,

图-48
右键点击Displays上边,然后再选择“Move”,

图-49 安装net-tools工具:
在ubuntu-18.04,ifconfig 已经被ip 取代,比如ifconfig –a 应该改成ip –a,但是我们有些脚本还需要用到ifconfig,后面安装VMware-tools的需要用到,
#apt-get install net-tools

图-50 安装gnome优化界面工具,这个好处可以百毒一下。
#apt install gnome-tweak-tool
#apt install gnome-shell-extensions
#apt install chrome-gnome-shell
继续安装有用的工具
#apt install make (天啊这个命令没有默认自带,还要我们自己安装)
#apt install unrar
安装文件夹和文件比较工具meld
#apt install meld 4、 在ubuntu-18.04 LTS安装VMware-tools
图-51
运行ubuntu-18.04虚拟机,然后点击VMware Workstation菜单,见图-51。
图-52
虚拟机里面的光盘会链接到VMware tools的镜像。
图-53
图-54
在/media/root/VMware Tools目录下,去解压压缩文件包到一个临时目录。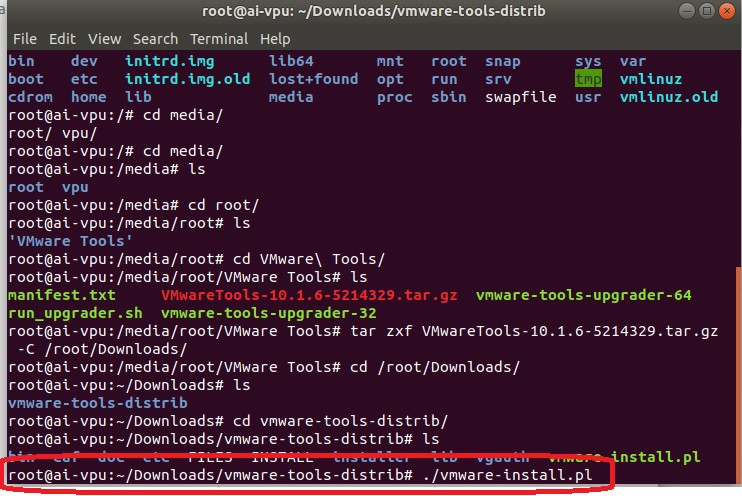
图-55
解压完后,进入临时目录的vmware-tools-distrib文件夹,执行./vmware-install.pl。
图-56
一定要输入“Y”回车。
图-57
这个图-57的地方就是如果没预先安装apt install net-tools,就没有ifconfig常用的命令,就会出现图-57的问题,然后输入“yes”可以解决问题,但按照本文的步骤来安装,就不会出现找不到ifconfig的原因,VMware-tools安装会顺利些。
图-58 安装VMware-tools结束后,我们继续设置虚拟机。

图-59
设置和WIN7共享文件夹。
图-60 在WIN7某个盘生产一个新的共享文件夹。

图-61 到图-61的地方就基本搞定WIN7和虚拟机里面的ubuntu-18.04共享文件夹了。在ubuntu-18.04的命令行进入:
#cd /mnt/hgfs
#ls
就可以看到共享文件夹的名字ubuntu18s。 5、 解决ubuntu-18.04休眠死机的办法
有网友给出以下方法:
#apt install pm-units(ubuntu-18.04已经自带安装好的,可以不用安装)
#apt install laptop-mode-tools
#gedit /etc/laptop-mode/laptop-mode.conf

图-62
保存退出
#laptop_mode start
#cat /proc/sys/vm/laptop_mode
如果显示值为非0,那就OK了。
以上是网友提供的方法,但是本人测试后还是不行,就是本人电脑WIN7进入休眠状态后,正在虚拟机里运行的ubuntu-18.04还是死机,分析很多网友同样的问题,很可能是显卡驱动的问题,还有内核版本的问题。这里本人还没有测试在VM虚拟机里面更新显卡驱动。所以这个问题还是没有很好的解决,如果有网友能够彻底这个BUG,可以分享出来学习。
(补充说明:更新ubuntu-18.04内核版本到4.15.18和同时更新nvidia-390 nvidia-prime显卡驱动可以解决这个问题,感谢网友:https://www.cnblogs.com/maxuewei2/p/8974243.html) 五、 安装TFTP server ubuntu-18.04安装TFTP server和ubuntu-16.04一样。
使用tftpd-hpa,它是一个功能增强的TFTP服务器,
#apt install xinetd
#apt install tftpd-hpa
(注意:不要安装tftp-hpa客户端,否则板子无法TFTP下载BIN文件)
#mkdir /tftpboot
#chmod –R 777/tftpboot
#gedit /etc/default/tftpd-hpa
图-63 然后嵌入式板子要烧写的BIN文件放到这个/tftpboot目录,在板子的u-boot去tftp下载对应文件,OK没问题,可以正常下载烧写。 六、 安装NFS server #apt install nfs-kernel-server
#gedit /etc/exports

图-64 按上图添加板子以后要挂载的NFS文件系统的目录
还有个地方需要修改:
Ubuntu 17.10 之后 nfs 默认就只支持协议3和协议4,但是嵌入式板子 uboot 默认启动的是协议2,若想要求主机 nfs 支持协议2,就得:
#gedit /etc/default/nfs-kernel-server
尾部添加:
RPCNFSDOPTS="--nfs-version 2,3,4 --debug --syslog"

图-65
保存文件退出,最后做:
#/usr/sbin/exportfs –av
#/etc/init.d/nfs-kernel-server restart
然后拿我们开发的海思Hi3516D板子,在UBOOT设置好bootarg NFS登录的参数,上电启动嵌入式Hi3516D板子。

图-66
出现图-65就说明NFS设置成功了。 七、 总结 至此,ubuntu-18.04 LTS嵌入式开发环境已经搭建好一大半,为什么这么说呢?因为嵌入式板子的交叉编译环境还没搭建,本人在这里也不想追加,因为我们开发的平台有DM8127(ARM+DSP),Hi3516(ARM+IVE), Hi3519(ARM+IVE),还有支持深度学习的VPU平台,每个平台的交叉编译工具不一样,所以本人就写到这里为止。后面有兴趣再写其他Hi3516-Hi3519的交叉编译环境搭建,而DM8127的开发环境以前已经写过,只不过最新的SDK版本3.9.1需要用到64位操作系统,其他搭建步骤大同小异。我们这里重点是如何在ubuntu-18.04 LTS上面搭建嵌入式LINUX开发环境,因为ubuntu-18.04 LTS刚发布不久,很多东西需要去体验和修正,本人写出来,希望得到高手指正,让ubuntu-18.04 LTS开发环境更流畅好用。本人交流联系方式:QQ:2505133162。
ubuntu-18.04 LTS长期支持版本代号叫仿生海狸,使用linux kernel v4.15版本,
ubuntu-16.04 LTS 的Unity被取消,被ubuntu-18.04 LTS gnome取代,其他详细的优缺点可以看看其他网友的文章和官方的介绍。下载地址:https://www.ubuntu.com/download/alternative-downloads,
下面开始我们的搭建步骤,用图说话,有些步骤和本人写的《图像识别DM8127开发攻略——开发环境搭建》里面描述的ubuntu-16.04 LTS很类似,毕竟两个版本发布时间间隔不是很长。 二、 VMware-workstation-full-14.1.2安装(仅供学习参考)
我们一直使用VMware虚拟机,以前很多开发攻略文章都提到过,为了能够正常安装ubuntu-18.04 LTS,我们只能使用这个最新虚拟机版本,刚开始本人使用VMware-workstation-full-12.5.7,发觉安装不顺利,特别是安装到VMware tools共享文件夹的时候,失败了。然后本人就试试使用VMware-workstation-full-14.1.2来重新安装ubuntu-18.04 LTS,一切顺利。
点击安装VMware-workstation-full-14.1.2,如果电脑上面有旧版本的VM虚拟机,可以先卸载,再安装这个最新的VM虚拟机,这个并不影响你以前安装正在使用的那些ubuntu *.vmdk的开发环境,比如我们以前的Ubuntu16_dm8127.vmdk,是使用VMware-workstation-full-12.5.7安装的,现在安装好VMware-workstation-full-14.1.2同样可以使用,新版本VM肯定兼容以前的版本的东西。
图-1
按图-1 选择好路径安装,比如一般放在D盘。
图-2
网上下载的版本最好不要去打钩。
图-3
安装完先不要急点击“完成”,应该使用“许可证”去处理。本人这里提供不了密钥,要的话自己网上查找,呵呵。输入密钥完成VMware-workstation-full-14.1.2安装后,先不要急马上去安装ubuntu18.04,我们需要先在WIN7下面网络属性进入属性配置界面。见下图,“共享”的地方选择VMware Network Adapter VMnet1,这样后面创建ubuntu18.04虚拟机的时候,使用桥接网口模式可以让虚拟机可以访问WIN7的共享文件夹等等。
图-4
然后重启一下电脑,再安装ubuntu-18.04 LTS,效果估计更好 三、 ubuntu-18.04 LTS安装
图-5
图-6
图-7
图-8
图-9
本公司开发部电脑基本都是8G内存以上,我们一般建议使用3G内存给虚拟机,最低要求是2G。
图-10
图-11
图-12
图-13
图-14
老话题,保存虚拟机单独一个文件,在WIN7下好管理,好压缩保存虚拟机进行备份。在WIN7下找一个比较大空间的分区,分至少50G空间给虚拟机,因为以后要装很多东西。
图-15
图-16
先点击“自定义硬件”,按图-17,图-18设置,再点击完成。
图-17
找到你下载好的ubuntu-18.04-desktop-amd64.iso镜像文件。
图-18
图-18选择这个虚拟化Intel VT-x/EPT,是保证后面开始安装ubuntu-18.04 64位操作系统,一开始安装不成功的问题,见图-20的显示。
图-19
图-20
图-21
如果在图-18选择了虚拟化Intel VT-x/EPT还解决不了ubuntu-18.04 64位操作系统安装问题,则需要在启动电脑的时候,进入BIOS去设置,见图-21的选择,保存退出BIOS,就OK了。
图-22
进入熟悉的安装界面,继续看图说话。
图-23
图-24
允许升级安装一些第3方的软件包。
图-25
图-26
图-27
图-28
公司重点在做嵌入式AI ARM+VPU的平台,我们取的普通用户名字就叫ubuntu18vpu吧。图-28 的名字定义会体现在下图vpu@ai-vpu:,见图-29
图-29
图-30
开始长时间安装ubuntu-18.04。
图-31
ubuntu-18.04安装结束后,先不要急重启虚拟机Restart Now,应该按图-31先断开虚拟机光盘的镜像连接,即不要再让虚拟机启动的时候继续运行ubuntu-18.04-desktop-amd64.iso文件。
图-32
最后重启虚拟机。 四、 对ubuntu-18.04 LTS构建良好的开发环境 1、 ubuntu-18.04 LTS支持普通用户登录
图-33
图-34
按上面步骤安装好ubuntu-18.04后,重启虚拟机,就进入图-33的普通用户登录界面(本人发觉这个登录时间有点慢,目前还没有时间去优化ubuntu-18.04的启动脚本,网上有人说是界面管理工具,负责系统启动图形显示的plymouth-read-write.service和plymouth-quit-wait.service就占用了50多秒,有的说是虚拟机里面的显卡驱动安装问题),点击普通用户账号,输入密码登录。
图-35
接下来我们先熟悉ubuntu-18.04 LTS的界面,左下角那9个点就是:Show Applications,点击它,熟悉它。特别是settings界面见图-35,先设置有线网络,保证能在ubuntu-18.04里面能上网,否则无法进行软件包升级。其他settings可以放到后面再优化。
图-36
在图-35的settings界面,我们点击Network里面的Wired,则会出现图-36的界面,输入熟悉的网络配置,为了通过我们公司路由接到外网,这个DNS必须根据你公司连接外网的路由器分配的DNS一致。网络设置好后,我们可以点击火狐浏览器打开网页测试一下,网络通了就可以做apt install这些操作了。 2、 ubuntu-18.04 LTS支持root登录 首先在普通用户登录的情况下,使用#sudo su,然后输入普通用户ubuntu18vpu的密码1234567,临时切换到root权限下操作。
先安装vim编辑器,#apt-get install 和#apt install命令是一样的。
#apt install vim
#apt install v p n c git (v p n c 竟然被屏蔽,注意没空格)
图-37
图-38
然后按图-38进入/etc/pam.d目录下,#vim gdm-autologin
图-39
按图-39修改屏蔽,然后保存文件退出。
图-40
按图-40修改,#vim gdm-password,保存退出。
图-41
使用#passwd root,添加root,并设置root的登录密码2次,我们使用简单的1234567密码,见图-41。
然后编辑/root/.profile文件,#vim /root/.profile
图-42
按图-42红框去修改,先屏蔽mesg n || true,然后后面添加:
tty –s && mesg n || true
保存退出。
重启虚拟机,进入下面的登录界面。
图-43
图-44
图-45
点击“ Not listed?”,去选择root登录,见图-43,图-44,图-45。
做linux嵌入式开发,我们喜欢使用root权限去操作,下面其他步骤也是在root的权限下去做的。
3、 ubuntu-18.04 LTS优化界面
我们回到图-35的settings界面,继续对ubuntu-18.04 LTS环境进行优化, 比如背景设置Background,设置电源Power关闭屏保等等,
图-46
图-47
设置显示设备模式,我们选择1280*800模式。刚开始看不完整个界面,可以按下图-48去操作,
图-48
右键点击Displays上边,然后再选择“Move”,
图-49 安装net-tools工具:
在ubuntu-18.04,ifconfig 已经被ip 取代,比如ifconfig –a 应该改成ip –a,但是我们有些脚本还需要用到ifconfig,后面安装VMware-tools的需要用到,
#apt-get install net-tools
图-50 安装gnome优化界面工具,这个好处可以百毒一下。
#apt install gnome-tweak-tool
#apt install gnome-shell-extensions
#apt install chrome-gnome-shell
继续安装有用的工具
#apt install make (天啊这个命令没有默认自带,还要我们自己安装)
#apt install unrar
安装文件夹和文件比较工具meld
#apt install meld 4、 在ubuntu-18.04 LTS安装VMware-tools
图-51
运行ubuntu-18.04虚拟机,然后点击VMware Workstation菜单,见图-51。
图-52
虚拟机里面的光盘会链接到VMware tools的镜像。
图-53
图-54
在/media/root/VMware Tools目录下,去解压压缩文件包到一个临时目录。
图-55
解压完后,进入临时目录的vmware-tools-distrib文件夹,执行./vmware-install.pl。
图-56
一定要输入“Y”回车。
图-57
这个图-57的地方就是如果没预先安装apt install net-tools,就没有ifconfig常用的命令,就会出现图-57的问题,然后输入“yes”可以解决问题,但按照本文的步骤来安装,就不会出现找不到ifconfig的原因,VMware-tools安装会顺利些。
图-58 安装VMware-tools结束后,我们继续设置虚拟机。
图-59
设置和WIN7共享文件夹。
图-60 在WIN7某个盘生产一个新的共享文件夹。
图-61 到图-61的地方就基本搞定WIN7和虚拟机里面的ubuntu-18.04共享文件夹了。在ubuntu-18.04的命令行进入:
#cd /mnt/hgfs
#ls
就可以看到共享文件夹的名字ubuntu18s。 5、 解决ubuntu-18.04休眠死机的办法
有网友给出以下方法:
#apt install pm-units(ubuntu-18.04已经自带安装好的,可以不用安装)
#apt install laptop-mode-tools
#gedit /etc/laptop-mode/laptop-mode.conf
图-62
保存退出
#laptop_mode start
#cat /proc/sys/vm/laptop_mode
如果显示值为非0,那就OK了。
以上是网友提供的方法,但是本人测试后还是不行,就是本人电脑WIN7进入休眠状态后,正在虚拟机里运行的ubuntu-18.04还是死机,分析很多网友同样的问题,很可能是显卡驱动的问题,还有内核版本的问题。这里本人还没有测试在VM虚拟机里面更新显卡驱动。所以这个问题还是没有很好的解决,如果有网友能够彻底这个BUG,可以分享出来学习。
(补充说明:更新ubuntu-18.04内核版本到4.15.18和同时更新nvidia-390 nvidia-prime显卡驱动可以解决这个问题,感谢网友:https://www.cnblogs.com/maxuewei2/p/8974243.html) 五、 安装TFTP server ubuntu-18.04安装TFTP server和ubuntu-16.04一样。
使用tftpd-hpa,它是一个功能增强的TFTP服务器,
#apt install xinetd
#apt install tftpd-hpa
(注意:不要安装tftp-hpa客户端,否则板子无法TFTP下载BIN文件)
#mkdir /tftpboot
#chmod –R 777/tftpboot
#gedit /etc/default/tftpd-hpa
图-63 然后嵌入式板子要烧写的BIN文件放到这个/tftpboot目录,在板子的u-boot去tftp下载对应文件,OK没问题,可以正常下载烧写。 六、 安装NFS server #apt install nfs-kernel-server
#gedit /etc/exports
图-64 按上图添加板子以后要挂载的NFS文件系统的目录
还有个地方需要修改:
Ubuntu 17.10 之后 nfs 默认就只支持协议3和协议4,但是嵌入式板子 uboot 默认启动的是协议2,若想要求主机 nfs 支持协议2,就得:
#gedit /etc/default/nfs-kernel-server
尾部添加:
RPCNFSDOPTS="--nfs-version 2,3,4 --debug --syslog"
图-65
保存文件退出,最后做:
#/usr/sbin/exportfs –av
#/etc/init.d/nfs-kernel-server restart
然后拿我们开发的海思Hi3516D板子,在UBOOT设置好bootarg NFS登录的参数,上电启动嵌入式Hi3516D板子。
图-66
出现图-65就说明NFS设置成功了。 七、 总结 至此,ubuntu-18.04 LTS嵌入式开发环境已经搭建好一大半,为什么这么说呢?因为嵌入式板子的交叉编译环境还没搭建,本人在这里也不想追加,因为我们开发的平台有DM8127(ARM+DSP),Hi3516(ARM+IVE), Hi3519(ARM+IVE),还有支持深度学习的VPU平台,每个平台的交叉编译工具不一样,所以本人就写到这里为止。后面有兴趣再写其他Hi3516-Hi3519的交叉编译环境搭建,而DM8127的开发环境以前已经写过,只不过最新的SDK版本3.9.1需要用到64位操作系统,其他搭建步骤大同小异。我们这里重点是如何在ubuntu-18.04 LTS上面搭建嵌入式LINUX开发环境,因为ubuntu-18.04 LTS刚发布不久,很多东西需要去体验和修正,本人写出来,希望得到高手指正,让ubuntu-18.04 LTS开发环境更流畅好用。本人交流联系方式:QQ:2505133162。