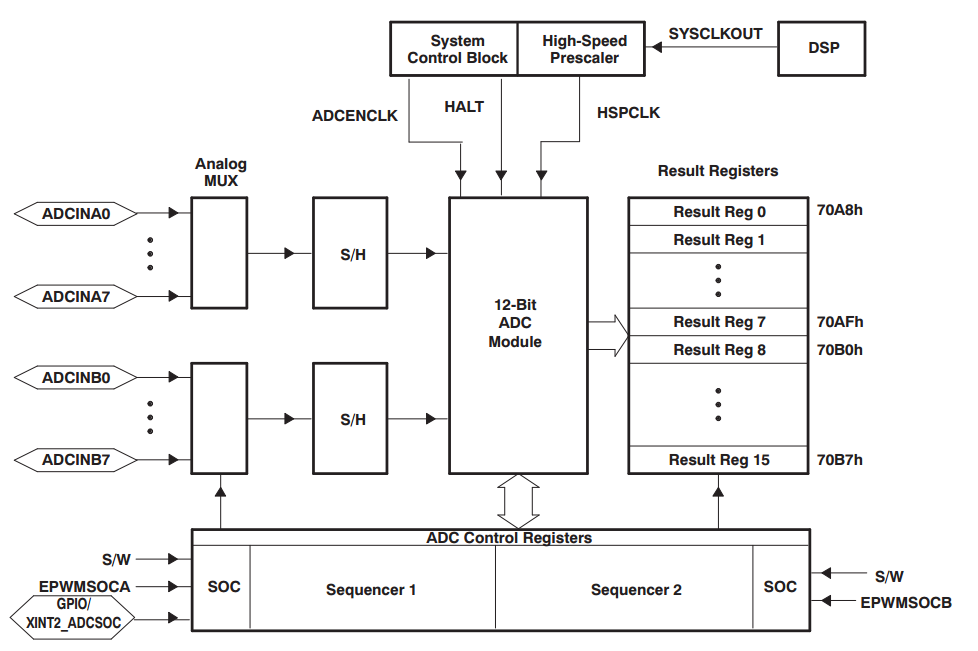
F28335内部集成了一块ADC转换模块。核心是一个12位精度的模数转换器。ADC模块一般都是非常昂贵的,但是有时候我们必须要转换好几个信号,可是这样就需要接多个模数芯片,这样是非常昂贵的,所以一般都是采用分时复用。在F28335中通过多时复用产生了16个输入通道。只有一个转换器肯定不可能同时进行16路转换,此时就是时间换资源,并且在内部还有两个采样保持器,这两个采样保持器肯定也不可能同转换,也是分时的。ADCAIN0~ADCAIN7的某个端口,比如ADCAIN4采到的电压,先存入S/H-A,ADCBIN0~ADCBIN7的某个端口,比如ADCBIN3采到的电压,先存入S/H-B,然后S/H-A的结果传到转换核心进行转换,结果存到Result Reg 0中,S/H-B的结果传到转换核心进行转换,结果存到Result Reg 1中,然后继续进行别的转换。而转换的顺序则是由两个排序器决定的。比如可以A0->A5->A2->A0->A1等等,当ADC接收到触发源的开始转换信号(SOC)就根据排序器自动完成多路转换,转换的结果也是依次存入结果寄存器中。

ADC有多个触发源可以启动转换(SOC)
1.S/W-软件立即启动
2.外部引脚
3.ePWMx SOCA启动
4.ePWMx SOCB启动
而且允许每个或者每隔一个序列转换结束就可以产生中断,方便读取数据。 最后上一个官方例程吧

ADC有多个触发源可以启动转换(SOC)
1.S/W-软件立即启动
2.外部引脚
3.ePWMx SOCA启动
4.ePWMx SOCB启动
而且允许每个或者每隔一个序列转换结束就可以产生中断,方便读取数据。 最后上一个官方例程吧
//###########################################################################
// Description
//! addtogroup f2833x_example_list
//!  ADC Start of Conversion (adc_soc)
//!
//! This ADC example uses ePWM1 to generate a periodic ADC SOC on SEQ1.
//! Two channels are converted, ADCINA3 and ADCINA2.
//!
//!  Watch  Variables

//! - Voltage1[10]  - Last 10 ADCRESULT0 values
//! - Voltage2[10]  - Last 10 ADCRESULT1 values
//! - ConversionCount   - Current result number 0-9
//! - LoopCount     - Idle loop counter
//
//
//###########################################################################
// $TI Release: F2833x/F2823x Header Files and Peripheral Examples V141 $
// $Release Date: November  6, 2015 $
// $Copyright: Copyright (C) 2007-2015 Texas Instruments Incorporated -
//             http://www.ti.com/ ALL RIGHTS RESERVED $
//###########################################################################

#include "DSP28x_Project.h"     // Device Headerfile and Examples Include File

// Prototype statements for functions found within this file.
__interrupt void adc_isr(void);

// Global variables used in this example:
Uint16 LoopCount;
Uint16 ConversionCount;
Uint16 Voltage1[10];
Uint16 Voltage2[10];

main()
{
// Step 1. Initialize System Control:
// PLL, WatchDog, enable Peripheral Clocks
// This example function is found in the DSP2833x_SysCtrl.c file.
   InitSysCtrl();

   EALLOW;
   #if (CPU_FRQ_150MHZ)     // Default - 150 MHz SYSCLKOUT
     #define ADC_MODCLK 0x3 // HSPCLK = SYSCLKOUT/2*ADC_MODCLK2 = 150/(2*3)   = 25.0 MHz
   #endif
   #if (CPU_FRQ_100MHZ)
     #define ADC_MODCLK 0x2 // HSPCLK = SYSCLKOUT/2*ADC_MODCLK2 = 100/(2*2)   = 25.0 MHz
   #endif
   EDIS;

   // Define ADCCLK clock frequency ( less than or equal to 25 MHz )
   // Assuming InitSysCtrl() has set SYSCLKOUT to 150 MHz
   EALLOW;
   SysCtrlRegs.HISPCP.all = ADC_MODCLK;
   EDIS;

// Step 2. Initialize GPIO:
// This example function is found in the DSP2833x_Gpio.c file and
// illustrates how to set the GPIO to it's default state.
// InitGpio();  // Skipped for this example

// Step 3. Clear all interrupts and initialize PIE vector table:
// Disable CPU interrupts
   DINT;

// Initialize the PIE control registers to their default state.
// The default state is all PIE interrupts disabled and flags
// are cleared.
// This function is found in the DSP2833x_PieCtrl.c file.
   InitPieCtrl();

// Disable CPU interrupts and clear all CPU interrupt flags:
   IER = 0x0000;
   IFR = 0x0000;

// Initialize the PIE vector table with pointers to the shell Interrupt
// Service Routines (ISR).
// This will populate the entire table, even if the interrupt
// is not used in this example.  This is useful for debug purposes.
// The shell ISR routines are found in DSP2833x_DefaultIsr.c.
// This function is found in DSP2833x_PieVect.c.
   InitPieVectTable();

// Interrupts that are used in this example are re-mapped to
// ISR functions found within this file.
   EALLOW;  // This is needed to write to EALLOW protected register
   PieVectTable.ADCINT = &adc_isr;
   EDIS;    // This is needed to disable write to EALLOW protected registers

// Step 4. Initialize all the Device Peripherals:
// This function is found in DSP2833x_InitPeripherals.c
// InitPeripherals(); // Not required for this example
   InitAdc();  // For this example, init the ADC

// Step 5. User specific code, enable interrupts:

// Enable ADCINT in PIE
   PieCtrlRegs.PIEIER1.bit.INTx6 = 1;
   IER |= M_INT1; // Enable CPU Interrupt 1
   EINT;          // Enable Global interrupt INTM
   ERTM;          // Enable Global realtime interrupt DBGM

   LoopCount = 0;
   ConversionCount = 0;

// Configure ADC
   AdcRegs.ADCTRL1.bit.ACQ_PS = ADC_SHCLK;//顺序采样方式
   AdcRegs.ADCTRL3.bit.ADCCLKPS = ADC_CKPS;//ADC工作25Mhz,不再分频
   AdcRegs.ADCTRL1.bit.SEQ_CASC = 1;        // 1通道模式,级联
   AdcRegs.ADCTRL1.bit.CONT_RUN = 1;       // Setup continuous run

   AdcRegs.ADCMAXCONV.all = 0x0001;       // Setup 2 conv's on SEQ1
   AdcRegs.ADCCHSELSEQ1.bit.CONV00 = 0x3; // Setup ADCINA3 as 1st SEQ1 conv.
   AdcRegs.ADCCHSELSEQ1.bit.CONV01 = 0x2; // Setup ADCINA2 as 2nd SEQ1 conv.
   AdcRegs.ADCTRL2.bit.EPWM_SOCA_SEQ1 = 1;// Enable SOCA from ePWM to start SEQ1
   AdcRegs.ADCTRL2.bit.INT_ENA_SEQ1 = 1;  // Enable SEQ1 interrupt (every EOS)

// Assumes ePWM1 clock is already enabled in InitSysCtrl();
   EPwm1Regs.ETSEL.bit.SOCAEN = 1;        // Enable SOC on A group
   EPwm1Regs.ETSEL.bit.SOCASEL = 4;       // Select SOC from from CPMA on upcount
   EPwm1Regs.ETPS.bit.SOCAPRD = 1;        // Generate pulse on 1st event
   EPwm1Regs.CMPA.half.CMPA = 0x0080;     // Set compare A value
   EPwm1Regs.TBPRD = 0xFFFF;              // Set period for ePWM1
   EPwm1Regs.TBCTL.bit.CTRMODE = 0;       // count up and start

// Wait for ADC interrupt
   for(;;)
   {
      LoopCount++;
   }
}

__interrupt void  adc_isr(void)
{
  Voltage1[ConversionCount] = AdcRegs.ADCRESULT0 >>4;
  Voltage2[ConversionCount] = AdcRegs.ADCRESULT1 >>4;

  // If 40 conversions have been logged, start over
  if(ConversionCount == 9)
  {
     ConversionCount = 0;
  }
  else
  {
      ConversionCount++;
  }

  // Reinitialize for next ADC sequence
  AdcRegs.ADCTRL2.bit.RST_SEQ1 = 1;         // Reset SEQ1
  AdcRegs.ADCST.bit.INT_SEQ1_CLR = 1;       // Clear INT SEQ1 bit
  PieCtrlRegs.PIEACK.all = PIEACK_GROUP1;   // Acknowledge interrupt to PIE

  return;
}