{var%20f='http://v.t.sina.com.cn/share/share.php?appkey=1515056452',u=z||d.location,p=['&url=',e(u),'&title=',e(t||d.title),'&source=',e(r),'&sourceUrl=',e(l),'&content=',c||'gb2312','&pic=',e(p||'')].join('');function%20a(){if(!window.open([f,p].join(''),'mb',['toolbar=0,status=0,resizable=1,width=440,height=430,left=',(s.width-440)/2,',top=',(s.height-430)/2].join('')))u.href=[f,p].join('');};if(/Firefox/.test(navigator.userAgent))setTimeout(a,0);else%20a();})(screen,document,encodeURIComponent,'','','https://www.xiaopingtou.cn//data/attach/topic/topicKPo7gB.jpg', '推荐 gl417270208 的文章《CCS调试XDAIS算法》','https://www.xiaopingtou.net/article-79300.html','页面编码gb2312|utf-8默认gb2312'));)
1 使用eXpressDSP Component Wizard生成算法
为了简化xDAIS算法的开发步骤,我们可以使用eXpressDSP Component Wizard这个工具,在安装之后,它会出现在CCS的Tool菜单栏中,使用非常方便。eXpressDSPComponent Wizard通过图形化的配置界面引导用户一步一步地完成一个xDAIS算法模块的设计。在配置完成之后,eXpressDSP Component Wizard会生成所有的源文件、头文件以及测试文件,在用户添加上自己的算法代码之后可以很方便地进行测试。 使用eXpressDSPComponent Wizard可以使用户不用过多关注xDAIS算法标准而专注于自己的算法开发,几乎所有与算法标准相关的问题都有eXpressDSP Component Wizard自动完成了,所以,使用eXpressDSPComponent Wizard会大大缩短算法开发时间。1.1 安装eXpressDSPComponent Wizard
1,首先,需要下载eXpressDSPComponent Wizard这个软件,下载的地址为https://www-a.ti.com/downloads/sds_support/targetcontent/XDAIS/xdais_4_0/ti_xdais_v4.0d_setup.exe(需要使用TI账户)。 2, eXpressDSPComponent Wizard的默认的安装地址为c: xdaisxdais_4.0d,安装完成之后,需要修改安装目录下的config.gmk文件,将其中的CCS安装路径和BIOS安装路径修改为自己的安装路径。修改时需要注意的是这里使用左斜杠,而不是windows系统中使用的右斜杠。 # Define the full path of the root directory in which DSP/BIOS was installed. # For BIOS 4.90 users, the CCS installation directory is the value needed # by the build system. For BIOS 5.20 users, the BIOS installation directory # is the required value. # BIOS_INSTALL_DIR = C:/CCStudio_v3.1/ # BIOS_INSTALL_DIR = C:/bios_5_20/ BIOS_INSTALL_DIR = C:/CCStudio_v3.3/bios_5_31_02 # Define the full path of the CCS installation # CCS_INSTALL_DIR = C:/CCStudio_v3.1/ CCS_INSTALL_DIR = C:/CCStudio_v3.3 3,如果eXpressDSPComponent Wizard安装路径不是使用默认路径,那么,还需要修改config.gmk文件中的XDAIS_INSTALL_DIR变量为自己所使用的安装路径。 # Define the full path of the xdais installation directory # XDAIS_INSTALL_DIR = C:/xdais/xdais_4.0d/ XDAIS_INSTALL_DIR = C:/CCStudio_v3.3/xdais_4.0d 4, 完成以上步骤之后,启动CCS,就可以在菜单栏中看到相关选项。
1.2 配置eXpressDSPComponent Wizard
1, 在菜单栏中启动ComponentWizard Control,出现图形配置界面,我们需要新建xDAIS算法,所以选择 New。 2,接下来,选择CPU架构。DM6467的CPU架构是C64x,字节顺序为小端模式。
 3,设置算法模块的名字,提供者以及相关备注信息。
 4,设置算法的输入输出参数,暂时我们的算法没有使用任何参数,设置为0。
 5,设置算法的内存需求,需要将其中的Space属性修改为IALG_EXTERNAL。

6,设置用户函数和相关参数。
 7,点击图中的“Add”按钮,设置函数名为process,返回值为XDAS_Int32,参数个数为4,。
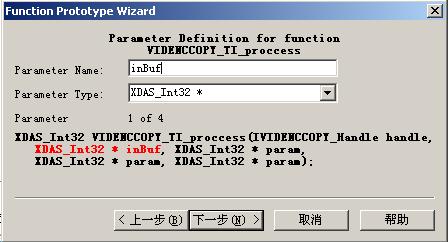
 8,设置四个参数的名称依次分别为inBufs,outBufs,inArgs和outArgs,数据类型都为XDAS_Int32 *。
 9,下一步点击“next”,然后设置合适路径并点击图中的“Generate Code”。
 至此,一个xDAIS算法模块就已经生成了,下一步就是添加自定义的算法,然后进行测试。