{var%20f='http://v.t.sina.com.cn/share/share.php?appkey=1515056452',u=z||d.location,p=['&url=',e(u),'&title=',e(t||d.title),'&source=',e(r),'&sourceUrl=',e(l),'&content=',c||'gb2312','&pic=',e(p||'')].join('');function%20a(){if(!window.open([f,p].join(''),'mb',['toolbar=0,status=0,resizable=1,width=440,height=430,left=',(s.width-440)/2,',top=',(s.height-430)/2].join('')))u.href=[f,p].join('');};if(/Firefox/.test(navigator.userAgent))setTimeout(a,0);else%20a();})(screen,document,encodeURIComponent,'','','https://www.xiaopingtou.cn//data/attach/topic/topicKPo7gB.jpg', '推荐 LiSrRb-6 的文章《直播二:iOS中硬编码(VideoToolBox)》','https://www.xiaopingtou.net/article-84750.html','页面编码gb2312|utf-8默认gb2312'));)
硬编码相对于软编码来说,使用非CPU进行编码,如显卡GPU、专用的DSP、FPGA、ASIC芯片等,性能高,对CPU没有压力,但是对其他硬件要求较高(如GPU等)。
在iOS8之后,苹果开放了接口,并且封装了VideoToolBox&AudioToolbox两个框架,分别用于对视频&音频进行硬编码,音频编码放在后面做总结,这次主要总结VideoToolBox。
Demo的Github地址:https://github.com/wzpziyi1/HardCoding-For-iOS
1、相关基础数据结构:
CVPixelBuffer:编码前和解码后的图像数据结构。
CMTime、CMClock和CMTimebase:时间戳相关。时间以64-bit/32-bit的形式出现。
CMBlockBuffer:编码后,结果图像的数据结构。
CMVideoFormatDescription:图像存储方式,编解码器等格式描述。
CMSampleBuffer:存放编解码前后的视频图像的容器数据结构。
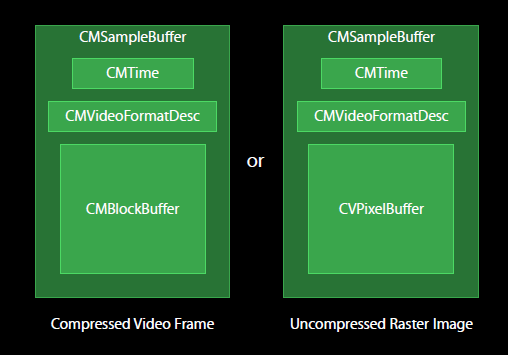 如图所示,编解码前后的视频图像均封装在CMSampleBuffer中,如果是编码后的图像,以CMBlockBuffe方式存储;解码后的图像,以CVPixelBuffer存储。CMSampleBuffer里面还有另外的时间信息CMTime和视频描述信息CMVideoFormatDesc。
代码A:
// 编码完成回调
void finishCompressH264Callback(void *outputCallbackRefCon, void *sourceFrameRefCon, OSStatus status, VTEncodeInfoFlags infoFlags, CMSampleBufferRef sampleBuffer)
{
if (status != noErr) return;
//根据传入的参数获取对象
ZYVideoEncoder *encoder = (__bridge ZYVideoEncoder *)(outputCallbackRefCon);
//判断是否是关键帧
bool isKeyFrame = !CFDictionaryContainsKey( (CFArrayGetValueAtIndex(CMSampleBufferGetSampleAttachmentsArray(sampleBuffer, true), 0)), kCMSampleAttachmentKey_NotSync);
//如果是关键帧,获取sps & pps数据
if (isKeyFrame)
{
CMFormatDescriptionRef format = CMSampleBufferGetFormatDescription(sampleBuffer);
//获取sps信息
size_t sparameterSetSize, sparameterSetCount;
const uint8_t *sparameterSet;
CMVideoFormatDescriptionGetH264ParameterSetAtIndex(format, 0, &sparameterSet, &sparameterSetSize, &sparameterSetCount, 0);
// 获取PPS信息
size_t pparameterSetSize, pparameterSetCount;
const uint8_t *pparameterSet;
CMVideoFormatDescriptionGetH264ParameterSetAtIndex(format, 1, &pparameterSet, &pparameterSetSize, &pparameterSetCount, 0 );
// 装sps/pps转成NSData,以方便写入文件
NSData *sps = [NSData dataWithBytes:sparameterSet length:sparameterSetSize];
NSData *pps = [NSData dataWithBytes:pparameterSet length:pparameterSetSize];
// 写入文件
[encoder gotSpsPps:sps pps:pps];
}
//获取数据块
CMBlockBufferRef dataBuffer = CMSampleBufferGetDataBuffer(sampleBuffer);
size_t length, totalLength;
char *dataPointer;
OSStatus statusCodeRet = CMBlockBufferGetDataPointer(dataBuffer, 0, &length, &totalLength, &dataPointer);
if (statusCodeRet == noErr)
{
size_t bufferOffset = 0;
// 返回的nalu数据前四个字节不是0001的startcode,而是大端模式的帧长度length
static const int AVCCHeaderLength = 4;
//循环获取nalu数据
while (bufferOffset < totalLength - AVCCHeaderLength)
{
uint32_t NALUnitLength = 0;
//读取NAL单元长度
memcpy(&NALUnitLength, dataPointer + bufferOffset, AVCCHeaderLength);
// 从大端转系统端
NALUnitLength = CFSwapInt32BigToHost(NALUnitLength);
NSData* data = [[NSData alloc] initWithBytes:(dataPointer + bufferOffset + AVCCHeaderLength) length:NALUnitLength];
[encoder gotEncodedData:data isKeyFrame:isKeyFrame];
// 移动到写一个块,转成NALU单元
bufferOffset += AVCCHeaderLength + NALUnitLength;
}
}
}
所需要的信息都可以从CMSampleBufferRef中得到。
2、NAL(网络提取层)代码讲解
直播一中提到了NALU概念上的封装,下面是代码部分:
代码B:
如图所示,编解码前后的视频图像均封装在CMSampleBuffer中,如果是编码后的图像,以CMBlockBuffe方式存储;解码后的图像,以CVPixelBuffer存储。CMSampleBuffer里面还有另外的时间信息CMTime和视频描述信息CMVideoFormatDesc。
代码A:
// 编码完成回调
void finishCompressH264Callback(void *outputCallbackRefCon, void *sourceFrameRefCon, OSStatus status, VTEncodeInfoFlags infoFlags, CMSampleBufferRef sampleBuffer)
{
if (status != noErr) return;
//根据传入的参数获取对象
ZYVideoEncoder *encoder = (__bridge ZYVideoEncoder *)(outputCallbackRefCon);
//判断是否是关键帧
bool isKeyFrame = !CFDictionaryContainsKey( (CFArrayGetValueAtIndex(CMSampleBufferGetSampleAttachmentsArray(sampleBuffer, true), 0)), kCMSampleAttachmentKey_NotSync);
//如果是关键帧,获取sps & pps数据
if (isKeyFrame)
{
CMFormatDescriptionRef format = CMSampleBufferGetFormatDescription(sampleBuffer);
//获取sps信息
size_t sparameterSetSize, sparameterSetCount;
const uint8_t *sparameterSet;
CMVideoFormatDescriptionGetH264ParameterSetAtIndex(format, 0, &sparameterSet, &sparameterSetSize, &sparameterSetCount, 0);
// 获取PPS信息
size_t pparameterSetSize, pparameterSetCount;
const uint8_t *pparameterSet;
CMVideoFormatDescriptionGetH264ParameterSetAtIndex(format, 1, &pparameterSet, &pparameterSetSize, &pparameterSetCount, 0 );
// 装sps/pps转成NSData,以方便写入文件
NSData *sps = [NSData dataWithBytes:sparameterSet length:sparameterSetSize];
NSData *pps = [NSData dataWithBytes:pparameterSet length:pparameterSetSize];
// 写入文件
[encoder gotSpsPps:sps pps:pps];
}
//获取数据块
CMBlockBufferRef dataBuffer = CMSampleBufferGetDataBuffer(sampleBuffer);
size_t length, totalLength;
char *dataPointer;
OSStatus statusCodeRet = CMBlockBufferGetDataPointer(dataBuffer, 0, &length, &totalLength, &dataPointer);
if (statusCodeRet == noErr)
{
size_t bufferOffset = 0;
// 返回的nalu数据前四个字节不是0001的startcode,而是大端模式的帧长度length
static const int AVCCHeaderLength = 4;
//循环获取nalu数据
while (bufferOffset < totalLength - AVCCHeaderLength)
{
uint32_t NALUnitLength = 0;
//读取NAL单元长度
memcpy(&NALUnitLength, dataPointer + bufferOffset, AVCCHeaderLength);
// 从大端转系统端
NALUnitLength = CFSwapInt32BigToHost(NALUnitLength);
NSData* data = [[NSData alloc] initWithBytes:(dataPointer + bufferOffset + AVCCHeaderLength) length:NALUnitLength];
[encoder gotEncodedData:data isKeyFrame:isKeyFrame];
// 移动到写一个块,转成NALU单元
bufferOffset += AVCCHeaderLength + NALUnitLength;
}
}
}
所需要的信息都可以从CMSampleBufferRef中得到。
2、NAL(网络提取层)代码讲解
直播一中提到了NALU概念上的封装,下面是代码部分:
代码B:
- (void)gotSpsPps:(NSData*)sps pps:(NSData*)pps
{
    // 拼接NALU的header
    const char bytes[] = "x00x00x00x01";
    size_t length = (sizeof bytes) - 1;
    NSData *ByteHeader = [NSData dataWithBytes:bytes length:length];

    // 将NALU的头&NALU的体写入文件
    [self.fileHandle writeData:ByteHeader];
    [self.fileHandle writeData:sps];
    [self.fileHandle writeData:ByteHeader];
    [self.fileHandle writeData:pps];

}

- (void)gotEncodedData:(NSData*)data isKeyFrame:(BOOL)isKeyFrame
{
    NSLog(@"gotEncodedData %d", (int)[data length]);
    if (self.fileHandle != NULL)
    {
        const char bytes[] = "x00x00x00x01";
        size_t length = (sizeof bytes) - 1; //string literals have implicit trailing '