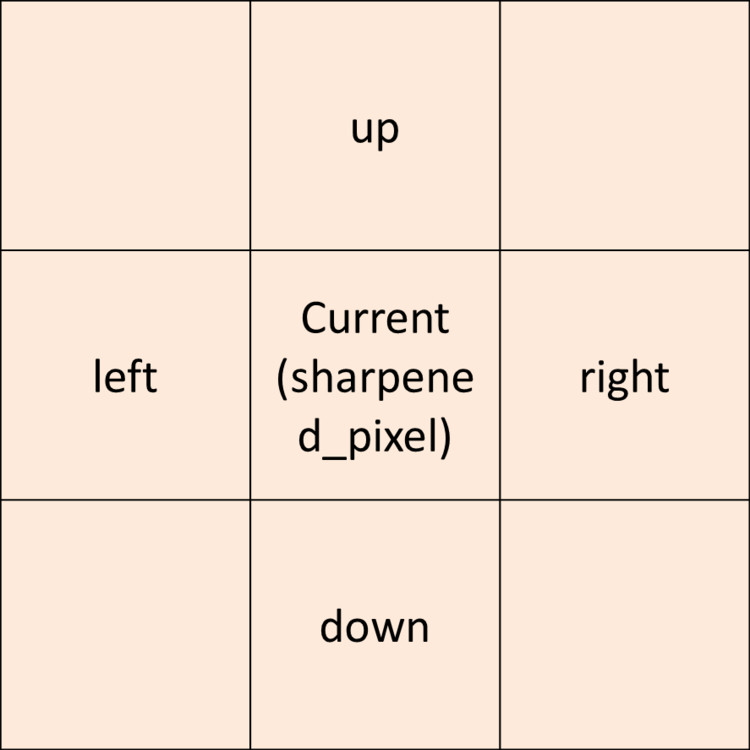
- 对于求一个锐化后的像素点(sharpened_pixel),这个基于拉普拉斯算子的简单算法主要是遍历图像中的像素点,根据领域像素确定其锐化后的值
- 计算公式:sharpened_pixel = 5 * current – left – right – up – down ;
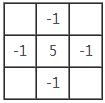
 当一个运算是通过领域像素进行的时候,我们通常用一个矩阵来表示这种运算关系,也就是我们经常所说的 核
(Kernel) 。那么上面的 锐化滤波器 (Sharpening Filter) 就可以用这个矩阵表示为它的核:
因为 滤波 在图像处理中是一个非常普通且常用的操作,所以OpenCV里面已经定义了一个特殊的函数用来执行这个操作。要使用它的话只需要定义一个 核 ,然后作为参数传递就行了。
[cpp] view plaincopy
- //手动实现拉普拉斯算子图像锐化
- void sharpenImage1(const Mat &image, Mat &result)
- {
- result.create(image.size(),image.type());//为输出图像分配内容
- /*拉普拉斯滤波核3*3
- 0 -1 0
- -1 5 -1
- 0 -1 0 */
- //处理除最外围一圈外的所有像素值
-
for(int i=1; i
- {
- const uchar * pre = image.ptr<const uchar>(i-1);//前一行
- const uchar * cur = image.ptr<const uchar>(i);//当前行,第i行
- const uchar * next = image.ptr<const uchar>(i+1);//下一行
-
uchar * output = result.ptr
(i);//输出图像的第i行 - int ch = image.channels();//通道个数
- int startCol = ch;//每一行的开始处理点
- int endCol = (image.cols-1)* ch;//每一行的处理结束点
- for(int j=startCol; j < endCol; j++)
- {
- //输出图像的遍历指针与当前行的指针同步递增, 以每行的每一个像素点的每一个通道值为一个递增量, 因为要
- 考虑到图像的通道数
-
//saturate_cast
保证结果在uchar范围内 -
*output++ = saturate_cast
(5*cur[j]-pre[j]-next[j]-cur[j-ch]-cur[j+ch]); - }
- }
- //将最外围一圈的像素值设为0
- result.row(0).setTo(Scalar(0));
- result.row(result.rows-1).setTo(Scalar(0));
- result.col(0).setTo(Scalar(0));
- result.col(result.cols-1).setTo(Scalar(0));
- /*/或者也可以尝试将最外围一圈设置为原图的像素值
- image.row(0).copyTo(result.row(0));
- image.row(image.rows-1).copyTo(result.row(result.rows-1));
- image.col(0).copyTo(result.col(0));
- image.col(image.cols-1).copyTo(result.col(result.cols-1));*/
- }
- //调用OpenCV函数实现拉普拉斯算子图像锐化
- void sharpenImage2(const Mat &image, Mat &result)
- {
- Mat kernel = (Mat_<float>(3,3) << 0,-1,0,-1,5,-1,0,-1,0);
- filter2D(image,result,image.depth(),kernel);
- }
- //main函数
- void main(){
- Mat mat = imread("images/lena.jpg");
- Mat result1;
- Mat result2;
- sharpenImage1(mat,result1);
- sharpenImage2(mat,result2);
- namedWindow("src");
- namedWindow("result1");
- namedWindow("result2");
- imshow("src",mat);
- imshow("result1",result1);
- imshow("result2",result2);
- }
结果:
 原图
原图

手动实现

调用OpenCV中函数实现
参考文章地址: http://ggicci.blog.163.com/blog/static/210364096201262123236955/
http://www.cnblogs.com/liu-jun/archive/2012/08/12/2635373.html