{var%20f='http://v.t.sina.com.cn/share/share.php?appkey=1515056452',u=z||d.location,p=['&url=',e(u),'&title=',e(t||d.title),'&source=',e(r),'&sourceUrl=',e(l),'&content=',c||'gb2312','&pic=',e(p||'')].join('');function%20a(){if(!window.open([f,p].join(''),'mb',['toolbar=0,status=0,resizable=1,width=440,height=430,left=',(s.width-440)/2,',top=',(s.height-430)/2].join('')))u.href=[f,p].join('');};if(/Firefox/.test(navigator.userAgent))setTimeout(a,0);else%20a();})(screen,document,encodeURIComponent,'','','https://www.xiaopingtou.cn//data/attach/topic/topicKPo7gB.jpg', '推荐 kakaroto 的文章《RHCS集群架构(一)之Fence实现Nginx高可用》','https://www.xiaopingtou.net/article-87607.html','页面编码gb2312|utf-8默认gb2312'));)
class="markdown_views prism-atom-one-light">


一、Fence简介
1、Fence的作用
fence主要在架构的作用为防止二个服务器同时向资源写数据,破坏了资源的安全性和一致性从而导致脑裂的发生。2、Fence分类
- 硬件Fence:通过关掉电源来踢掉坏的服务器通过断掉down服务器电源
- 软件Fence:,通过线缆、软件来踢掉坏的服务器
二、实验环境
1、操作系统
 虚拟机系统:redhat6.5
 真机:redhat7.2
2、yum源
 [rhel6.5]
 name=rhel6.5
 baseurl=http://10.10.10.250/rhel6.5
 gpgcheck=0

 [HighAvailability]
 name=HighAvailability
 baseurl=http://10.10.10.250/rhel6.5/HighAvailability
 gpgcheck=0

 [LoadBalancer]
 name=LoadBalancer
 baseurl=http://10.10.10.250/rhel6.5/LoadBalancer
 gpgcheck=0

 [ScalableFileSystem]
 name=ScalableFileSystem
 baseurl=http://10.10.10.250/rhel6.5/ScalableFileSystem
 gpgcheck=0

 [ResilientStorage]
 name=ResilientStorage
 baseurl=http://10.10.10.250/rhel6.5/ResilientStorage
 gpgcheck=0
3、主机名对应IP
 server1  ====>>   10.10.10.1(配置Nginx、ricci和luci)
 server2  ====>>   10.10.10.2(Apache)
 server3  ====>>   10.10.10.3(Apache)
 server4  ====>>   10.10.10.4(配置Nginx、ricci)
三、Nginx安装
1、解压tar包及优化
 tar zxf /mnt/nginx-1.10.1.tar.gz
 vim /mnt/nginx-1.10.0/src/core/nginx.h          ###关闭版本显示
  12 #define nginx_version      1010001
  13 #define NGINX_VERSION      "1.10.1"
  14 #define NGINX_VER          "nginx"

 vim /mnt/nginx-1.10.0/auto/cc/gcc             ###关闭调试环境
 # debug
 #CFLAGS="$CFLAGS -g"
2、编译安装Nginx
 yum install -y pcre-devel gcc openssl-devel
./configure --prefix=/usr/local/nginx --with-http_ssl_module --with-http_stub_status_module
 make && make install

 ln -s /usr/local/nginx/sbin/nginx /usr/local/sbin/
3、配置nginx.conf
 vim vim /usr/local/nginx/conf/nginx.conf                        ###在http里面加入
 upstream dream {
     server 10.10.10.2:80;
         server 10.10.10.3:80;
     }
 server {
    listen 80;
    server_name www.dream.com;
    location / {
           proxy_pass http://dream;
    }
 }
4、Nginx启动脚本
放在server1和server4的/etc/init.d/下 #!/bin/bash
. /etc/rc.d/init.d/functions
nginx=${nginx-/usr/local/nginx/sbin/nginx}
prog=nginx
RETVAL=0
start() {
echo -n $"Starting $prog: "
daemon $nginx
RETVAL=$?
echo
return $RETVAL
}
stop() {
echo -n $"Stopping $prog: "
killproc $nginx
RETVAL=$?
echo
}
reload() {
echo -n $"Reloading $prog: "
$nginx -s reload
echo
}
case "$1" in
start)
start
;;
stop)
stop
;;
status)
status -p $nginx
RETVAL=$?
;;
restart)
stop
start
;;
reload)
reload
;;
*)
echo $"Usage: $prog {start|stop|restart|condrestart|try-restart|force-reload|reload|status|fullstatus|graceful|help|configtest}"
RETVAL=2
esac
exit $RETVAL
四、ricci和luci安装
1、yum进行安装ricci、luci(server1)
 yum install -y ricci luci
 /etc/init.d/ricci restart
 /etc/init.d/luci restart
 passwd ricci                                 ###在redhat6.1以上的版本必须设置密码
 chkconfig ricci on                           ###一定要设置开机自启
 chkconfig luci on
2、yum进行安装ricci(server4)
 yum install -y ricci
 /etc/init.d/ricci restart
 passwd ricci
 chkconfig ricci on
五、网页设置
注意:如果创建失败在server1和server4中执行>/etc/cluster/cluster.conf清除掉,在执行网页设置步骤即可!!!
1、用root用户进行登陆
https://10.10.10.1:8084/
2、Cluster创建
3、此时server1和server4下载软件包并且重启,用ps aux查看
4、重启效果
5、Failover Domains设置
6、Resource设置
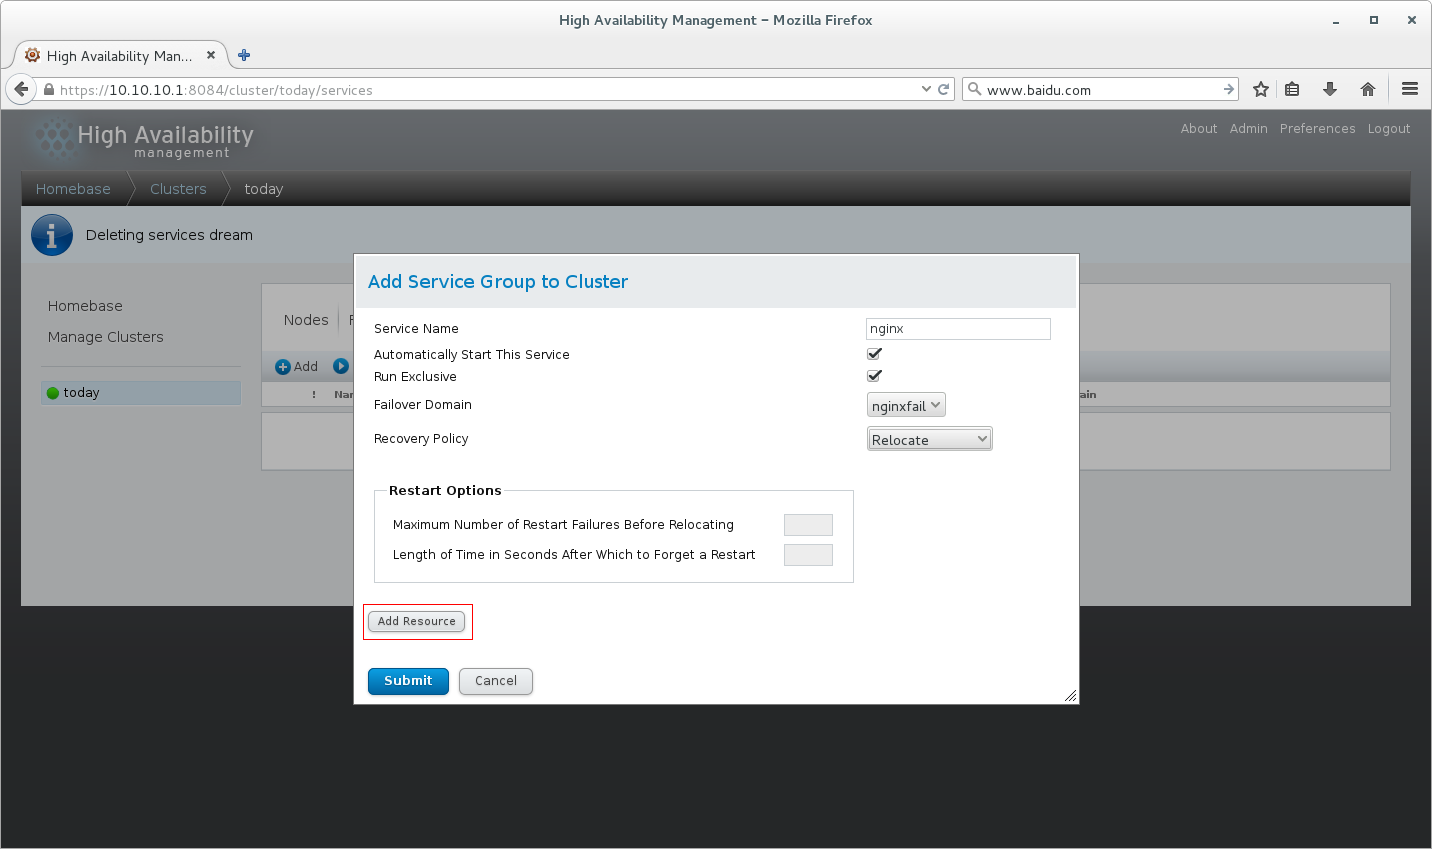
7、Service Group设置
8、点击Add Resource分别加入IP Address和Script,再Submit
六、查询
1、通过命令进行查询(server1)
 [root@server1 cluster]# cman_tool status
 Version: 6.2.0
 Config Version: 1
 Cluster Name: 11
 Cluster Id: 14140
 Cluster Member: Yes
 Cluster Generation: 80
 Membership state: Cluster-Member
 Nodes: 2
 Expected votes: 1
 Total votes: 2
 Node votes: 1
 Quorum: 1
 Active subsystems: 9
 Flags: 2node
 Ports Bound: 0 11
 Node name: server1
 Node ID: 1
 Multicast addresses: 239.192.55.115
 Node addresses: 10.10.10.1

 [root@server1 cluster]# clustat                      ###查看状态
 Cluster Status for 11 @ Thu Apr 12 14:50:09 2018
 Member Status: Quorate

  Member Name                             ID   Status
  ------ ----                             ---- ------
  server1                                     1 Online, Local
  server4                                     2 Online
我们也可以用ip addr查询VIP的位置
七、测试
1、在真机中加入host解析
 vim /etc/hosts
 10.10.10.100 www.dream.com

 curl www.dream.com
2、发现可以进行负载均衡,在server1中执行
/etc/init.d/nginx stop
可以发现在真机中照样可以访问,VIP跑到server4中,并且nginx服务也被开启,但是当你执行echo c>/proc/sysrq-trigger时,模拟内核崩溃,发现server1并没有接管,下面就是强大的fence讲解
八、fence机制
1、真机中生成KEY
 [root@foundation25 network-scripts]# mkdir /etc/cluster
 [root@foundation25 network-scripts]# dd if=/dev/urandom of=/etc/cluster/fence_xvm.key bs=128 count=1             ###生成随机数key
 1+0 records in
 1+0 records out
 128 bytes (128 B) copied, 0.000149135 s, 858 kB/s
2、把key传给2个节点
 scp /etc/cluster/fence_xvm.key root@10.10.10.1:/etc/cluster/
 scp /etc/cluster/fence_xvm.key root@10.10.10.4:/etc/cluster/
3、fence设置
 [root@foundation23 mnt]# fence_virtd -c                       ###如果没有yum进行下载即可
 Module search path [/usr/lib64/fence-virt]:

 Available backends:
    libvirt 0.1
 Available listeners:
    serial 0.4
    multicast 1.2

 Listener modules are responsible for accepting requests
 from fencing clients.

 Listener module [multicast]:                                  ###模式

 The multicast listener module is designed for use environments
 where the guests and hosts may communicate over a network using
 multicast.

 The multicast address is the address that a client will use to
 send fencing requests to fence_virtd.

 Multicast IP Address [225.0.0.12]:                           ###广播地址

 Using ipv4 as family.

 Multicast IP Port [1229]:                                    ###端口,可以自行指定

 Setting a preferred interface causes fence_virtd to listen only
 on that interface.  Normally, it listens on all interfaces.
 In environments where the virtual machines are using the host
 machine as a gateway, this *must* be set (typically to virbr0).
 Set to 'none' for no interface.

Interface [virbr0]: br0                                      ###此处根据自己的网卡名进行设置

The key file is the shared key information which is used to
authenticate fencing requests.  The contents of this file must
be distributed to each physical host and virtual machine within
a cluster.

 Key File [/etc/cluster/fence_xvm.key]:

 Backend modules are responsible for routing requests to
 the appropriate hypervisor or management layer.

 Backend module [libvirt]:

 Configuration complete.

 === Begin Configuration ===
 backends {
    libvirt {
        uri = "qemu:///system";
    }

 }

 listeners {
    multicast {
        port = "1229";
        family = "ipv4";
        interface = "br0";
        address = "225.0.0.12";
        key_file = "/etc/cluster/fence_xvm.key";
     }

 }

 fence_virtd {
    module_path = "/usr/lib64/fence-virt";
    backend = "libvirt";
    listener = "multicast";
 }

 === End Configuration ===
 Replace /etc/fence_virt.conf with the above [y/N]? y

systemctl restart fence_virtd.service                           ###重启fence服务,其配置文件在/etc/fence_virt.conf
九、网页设置
1、Fence Devices设置
2、Method Name可以自定义,在server4也进行同样的设置,添加到fence中
3、UUID查看方法
4、测试
(1)模拟内核崩溃(server1)
echo c>/proc/sysrq-trigger