stm32f429discovery模板加入原子哥的延时串口和位带操作

2019-07-21 03:53发布

今天拿到了stm32f429 discovery的开发板,板子很强大但是还是从基础的程序来吧,写着帖子主要是为了参加eeworld的活动,但是吃水不忘挖井人,在原子哥的群里跟大家在分享一下。
在已经建立好工程模板的基础上,进一步加入简单的操作函数方便以后的编程,直接使用原子哥战舰开发板配套程序
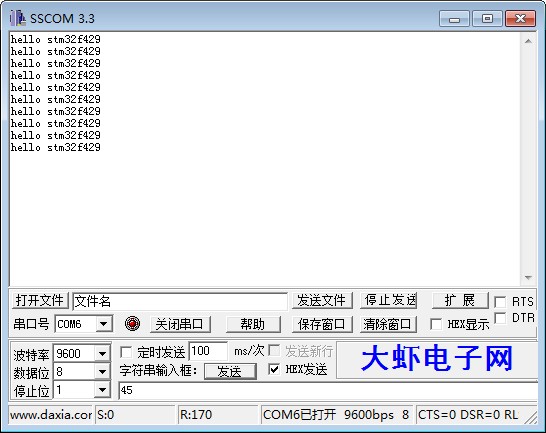
system文件夹里的函数,这跟文件夹里有延时函数,串口函数,位带操作函数,平常使用是非常方便,所以就把这个文件夹直接拷到stm32f429的工程模板中。 打开工程,在manage project items中新建sys文件夹,并将该文件夹下的.c文件添加进来,并且在options for targetc/c++选项卡中添加相应.h文件。类似于工程模板建立的过程。 延时函数和位带操作函数直接可以使用,串口初始化函数需要重新定义串口的引脚。具体程序: void uart_init(u32 bound){     //GPIO端口设置     GPIO_InitTypeDef GPIO_InitStructure;          USART_InitTypeDef USART_InitStructure;          NVIC_InitTypeDef NVIC_InitStructure;                       /* Enable GPIOC and GPIOE clock */   RCC_AHB1PeriphClockCmd(RCC_AHB1Periph_GPIOA , ENABLE);                     /* Enable USART1 APB clock */   RCC_APB2PeriphClockCmd(RCC_APB2Periph_USART1, ENABLE);            /* USART1 Pins configuration ************************************************/   /* Connect pin to Periph */   GPIO_PinAFConfig(GPIOA, GPIO_PinSource9, GPIO_AF_USART1);      GPIO_PinAFConfig(GPIOA, GPIO_PinSource10, GPIO_AF_USART1);            /* Configure pins as AF pushpull */   GPIO_InitStructure.GPIO_Pin = GPIO_Pin_9;   GPIO_InitStructure.GPIO_Mode = GPIO_Mode_AF;   GPIO_InitStructure.GPIO_Speed = GPIO_Speed_50MHz;   GPIO_InitStructure.GPIO_OType = GPIO_OType_PP;   GPIO_InitStructure.GPIO_PuPd = GPIO_PuPd_NOPULL;   GPIO_Init(GPIOA, &GPIO_InitStructure);             //TX     GPIO_InitStructure.GPIO_Pin = GPIO_Pin_10;   GPIO_InitStructure.GPIO_Mode = GPIO_Mode_AF;   GPIO_InitStructure.GPIO_Speed = GPIO_Speed_50MHz;   GPIO_InitStructure.GPIO_OType = GPIO_OType_PP;   GPIO_InitStructure.GPIO_PuPd = GPIO_PuPd_NOPULL;   GPIO_Init(GPIOA, &GPIO_InitStructure);             //RX      //Usart1 NVIC 配置       NVIC_InitStructure.NVIC_IRQChannel = USART1_IRQn;          NVIC_InitStructure.NVIC_IRQChannelPreemptionPriority=3 ;//抢占优先级3          NVIC_InitStructure.NVIC_IRQChannelSubPriority = 3;            //子优先级3          NVIC_InitStructure.NVIC_IRQChannelCmd = ENABLE;                    //IRQ通道使能          NVIC_Init(&NVIC_InitStructure);    //根据指定的参数初始化VIC寄存器      //USART 初始化设置            USART_InitStructure.USART_BaudRate = bound;//一般设置为9600;          USART_InitStructure.USART_WordLength = USART_WordLength_8b;//字长为8位数据格式          USART_InitStructure.USART_StopBits = USART_StopBits_1;//一个停止位          USART_InitStructure.USART_Parity = USART_Parity_No;//无奇偶校验位          USART_InitStructure.USART_HardwareFlowControl = USART_HardwareFlowControl_None;//无硬件数据流控制          USART_InitStructure.USART_Mode = USART_Mode_Rx | USART_Mode_Tx;        //收发模式       USART_Init(USART1, &USART_InitStructure); //初始化串口     USART_ITConfig(USART1, USART_IT_RXNE, ENABLE);//开启中断     USART_Cmd(USART1, ENABLE);                    //使能串口   } 在真正使用的时候,因为原子哥对printf函数做了重定义,所以直接使用printf函数就可以了。 设置好后可以编写主函数了,就以一个闪烁灯+串口发送为例。程序如下: #include "stm32f4xx.h" #include <stdio.h> #include "delay.h" #include "sys.h" #include "usart.h"   #define LED0 PGout(13) #define LED1 PGout(14)   void LED_Init(void) {    GPIO_InitTypeDef  GPIO_InitStructure;         RCC_AHB1PeriphClockCmd(RCC_AHB1Periph_GPIOG , ENABLE);         //??PE????           GPIO_InitStructure.GPIO_Pin = GPIO_Pin_13|GPIO_Pin_14;                                    GPIO_InitStructure.GPIO_Mode = GPIO_Mode_OUT;                   //????  GPIO_InitStructure.GPIO_Speed = GPIO_Speed_50MHz;             //IO????50MHz  GPIO_InitStructure.GPIO_OType = GPIO_OType_PP;  GPIO_InitStructure.GPIO_PuPd = GPIO_PuPd_NOPULL;  GPIO_Init(GPIOG, &GPIO_InitStructure);                                          //?????????GPIOB.5           GPIO_ResetBits(GPIOG,GPIO_Pin_13);                                                       //PE ???  GPIO_ResetBits(GPIOG,GPIO_Pin_14);         }     int main(void) {          delay_init();          LED_Init();          uart_init(9600);   while (1)   {                    LED0=1;                                                                     LED1=1;                    delay_ms(500);                    LED0=0;                                                                     LED1=0;                    delay_ms(500);                    printf("hello stm32f429 ");   } }   #define LED0 PGout(13),使用了位带操作,为了方便对引脚的操作,但是对引脚的初始化工作还是需要的。   在使用串口,延时函数前要先对其进行初始化,之后的程序就很简单了。编译下载到板子中测试一下。
 
友情提示: 此问题已得到解决,问题已经关闭,关闭后问题禁止继续编辑,回答。
该问题目前已经被作者或者管理员关闭, 无法添加新回复
6条回答
正点原子
1楼-- · 2019-07-21 03:58
 精彩回答 2  元偷偷看……
qiaoyang123
2楼-- · 2019-07-21 04:49
回复【2楼】正点原子:
---------------------------------
买个discovery板子玩玩挺好
九局下半
3楼-- · 2019-07-21 07:55
位带扩展不完全,仅仅像F1系列一样分配到G port
bingtuohun
4楼-- · 2019-07-21 08:29
F429了啊,不过感觉没有变频器应用STM32的单片机做核心处理,不知道为什么。
gjnacoose
5楼-- · 2019-07-21 09:39
 精彩回答 2  元偷偷看……
魔方奇才
6楼-- · 2019-07-21 11:25
请教一下楼主,F429DISCOVERY的PA9和PA10并没有通过电平转换芯片连接到上位机,这个怎么解决的?

一周热门 更多>