改动官方例程,使用STM32F103VCT(100pin),is61LV51216的SRAM,8M,FSMC配置如下:
#define Bank1_SRAM3_ADDR ((u32)0x68000000)
void FSMC_SRAM_Init(void){ FSMC_NORSRAMInitTypeDef FSMC_NORSRAMInitStructure; FSMC_NORSRAMTimingInitTypeDef p; GPIO_InitTypeDef GPIO_InitStructure; RCC_APB2PeriphClockCmd(RCC_APB2Periph_GPIOD | RCC_APB2Periph_GPIOC | RCC_APB2Periph_GPIOE , ENABLE); /*-- GPIO Configuration ------------------------------------------------------*/ /* SRAM Data lines configuration */
GPIO_InitStructure.GPIO_Pin = GPIO_Pin_0 | GPIO_Pin_1 | GPIO_Pin_2 | GPIO_Pin_3 | GPIO_Pin_4 | GPIO_Pin_5 | GPIO_Pin_6 | GPIO_Pin_7; GPIO_InitStructure.GPIO_Mode = GPIO_Mode_AF_PP; GPIO_InitStructure.GPIO_Speed = GPIO_Speed_50MHz; GPIO_Init(GPIOE, &GPIO_InitStructure); GPIO_InitStructure.GPIO_Pin = GPIO_Pin_8 | GPIO_Pin_9 | GPIO_Pin_10 | GPIO_Pin_11 | GPIO_Pin_12 | GPIO_Pin_13 | GPIO_Pin_14 | GPIO_Pin_15; GPIO_Init(GPIOE, &GPIO_InitStructure); /* SRAM Address lines configuration */ GPIO_InitStructure.GPIO_Pin = GPIO_Pin_0 | GPIO_Pin_1 | GPIO_Pin_2 | GPIO_Pin_3 | GPIO_Pin_4 | GPIO_Pin_5 | GPIO_Pin_6 | GPIO_Pin_7; GPIO_Init(GPIOD, &GPIO_InitStructure); GPIO_InitStructure.GPIO_Pin = GPIO_Pin_8 | GPIO_Pin_9 | GPIO_Pin_10 | GPIO_Pin_11 | GPIO_Pin_12 | GPIO_Pin_13 | GPIO_Pin_14 | GPIO_Pin_15; GPIO_Init(GPIOD, &GPIO_InitStructure); GPIO_InitStructure.GPIO_Pin = GPIO_Pin_6 | GPIO_Pin_7 | GPIO_Pin_8; GPIO_Init(GPIOC, &GPIO_InitStructure); /* NOE and NWE configuration */ GPIO_InitStructure.GPIO_Pin = GPIO_Pin_10 |GPIO_Pin_11; GPIO_Init(GPIOC, &GPIO_InitStructure); /* NE3 configuration */ GPIO_InitStructure.GPIO_Pin = GPIO_Pin_9; GPIO_Init(GPIOC, &GPIO_InitStructure); /* NBL0, NBL1 configuration */ GPIO_InitStructure.GPIO_Pin = GPIO_Pin_4 | GPIO_Pin_5; GPIO_Init(GPIOC, &GPIO_InitStructure);
RCC -> AHBENR |= 0x00000114; 使能FSMC时钟 /*-- FSMC Configuration ------------------------------------------------------ */ p.FSMC_AddressSetupTime = 2; p.FSMC_AddressHoldTime = 0; p.FSMC_DataSetupTime = 3; p.FSMC_BusTurnAroundDuration = 1; p.FSMC_CLKDivision = 0; p.FSMC_DataLatency = 0; p.FSMC_AccessMode = FSMC_AccessMode_A;
FSMC_NORSRAMInitStructure.FSMC_Bank = FSMC_Bank1_NORSRAM3; FSMC_NORSRAMInitStructure.FSMC_DataAddressMux = FSMC_DataAddressMux_Disable; //地址/数据不复用 FSMC_NORSRAMInitStructure.FSMC_MemoryType = FSMC_MemoryType_SRAM; //存储器类型 FSMC_NORSRAMInitStructure.FSMC_MemoryDataWidth = FSMC_MemoryDataWidth_16b; //数据宽度 FSMC_NORSRAMInitStructure.FSMC_BurstAccessMode = FSMC_BurstAccessMode_Disable; //成组模式访问 FSMC_NORSRAMInitStructure.FSMC_WaitSignalPolarity = FSMC_WaitSignalPolarity_Low; //等待信号极性 FSMC_NORSRAMInitStructure.FSMC_WrapMode = FSMC_WrapMode_Disable; //对齐成组模式 FSMC_NORSRAMInitStructure.FSMC_WaitSignalActive = FSMC_WaitSignalActive_BeforeWaitState; //配置等待时序 FSMC_NORSRAMInitStructure.FSMC_WriteOperation = FSMC_WriteOperation_Enable; //允许FSMC对存储器写操作 FSMC_NORSRAMInitStructure.FSMC_WaitSignal = FSMC_WaitSignal_Disable; //等待使能位 禁止 FSMC_NORSRAMInitStructure.FSMC_ExtendedMode = FSMC_ExtendedMode_Disable; //扩展模式选择 FSMC_NORSRAMInitStructure.FSMC_AsyncWait = FSMC_AsyncWait_Disable; // FSMC_NORSRAMInitStructure.FSMC_WriteBurst = FSMC_WriteBurst_Disable; //成组写使能选择 FSMC_NORSRAMInitStructure.FSMC_ReadWriteTimingStruct = &p; // FSMC_NORSRAMInitStructure.FSMC_WriteTimingStruct = &p; //
FSMC_NORSRAMInit(&FSMC_NORSRAMInitStructure);
/* Enable FSMC Bank1_SRAM Bank */ FSMC_NORSRAMCmd(FSMC_Bank1_NORSRAM3, ENABLE); }
写字节函数:
void FSMC_SRAM_WriteBuffer(u16* pBuffer, u32 WriteAddr, u32 NumHalfwordToWrite) { for(; NumHalfwordToWrite != 0; NumHalfwordToWrite--) /* while there is data to write */ { /* Transfer data to the memory */ *(u16 *) (Bank1_SRAM3_ADDR + WriteAddr) = *pBuffer++; /* Increment the address*/ WriteAddr += 2; } }
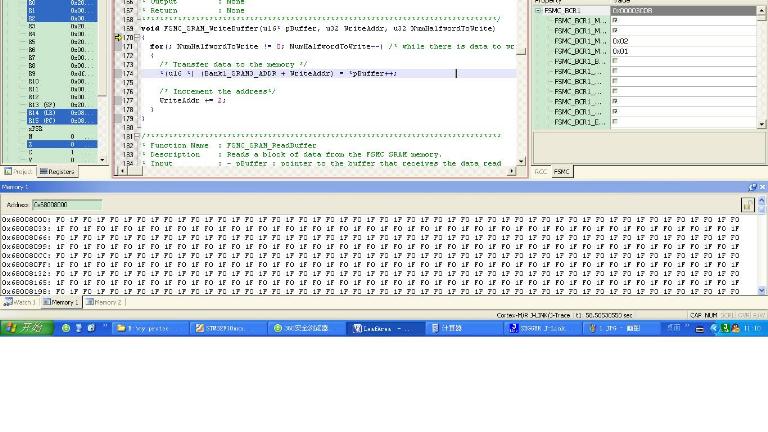
问题来了:我在仿真的时候观察地址中写入的数据时发现,一进入写字节函数0X68008000以后的地址全都是0x1FF0,

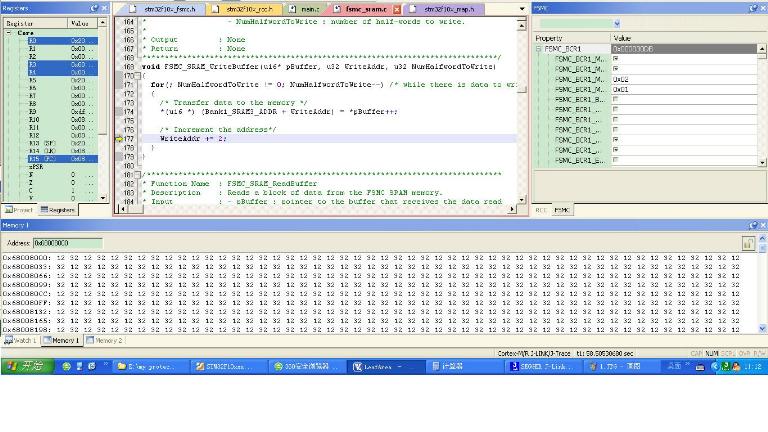
执行完 *(u16 *) (Bank1_SRAM3_ADDR + WriteAddr) = *pBuffer++;这条语句后, 0X68008000以后的地址全都被写入0x3212,

0x3212这个数写的是对的,但是为什么0x68008000以后的地址全都被写成0x3212啊?
另外,再执行 for(; NumHalfwordToWrite != 0; NumHalfwordToWrite--) 时, 0X68008000以后的地址又全都写入0x1FF0, 导致最后读出的数据全是0X1FF0,看写字节函数中应该是1个字一个字写呀,为什么写完之后全被0x1FF0覆盖呀,求教,不胜感激
#define Bank1_SRAM3_ADDR ((u32)0x68000000)
void FSMC_SRAM_Init(void){ FSMC_NORSRAMInitTypeDef FSMC_NORSRAMInitStructure; FSMC_NORSRAMTimingInitTypeDef p; GPIO_InitTypeDef GPIO_InitStructure; RCC_APB2PeriphClockCmd(RCC_APB2Periph_GPIOD | RCC_APB2Periph_GPIOC | RCC_APB2Periph_GPIOE , ENABLE); /*-- GPIO Configuration ------------------------------------------------------*/ /* SRAM Data lines configuration */
GPIO_InitStructure.GPIO_Pin = GPIO_Pin_0 | GPIO_Pin_1 | GPIO_Pin_2 | GPIO_Pin_3 | GPIO_Pin_4 | GPIO_Pin_5 | GPIO_Pin_6 | GPIO_Pin_7; GPIO_InitStructure.GPIO_Mode = GPIO_Mode_AF_PP; GPIO_InitStructure.GPIO_Speed = GPIO_Speed_50MHz; GPIO_Init(GPIOE, &GPIO_InitStructure); GPIO_InitStructure.GPIO_Pin = GPIO_Pin_8 | GPIO_Pin_9 | GPIO_Pin_10 | GPIO_Pin_11 | GPIO_Pin_12 | GPIO_Pin_13 | GPIO_Pin_14 | GPIO_Pin_15; GPIO_Init(GPIOE, &GPIO_InitStructure); /* SRAM Address lines configuration */ GPIO_InitStructure.GPIO_Pin = GPIO_Pin_0 | GPIO_Pin_1 | GPIO_Pin_2 | GPIO_Pin_3 | GPIO_Pin_4 | GPIO_Pin_5 | GPIO_Pin_6 | GPIO_Pin_7; GPIO_Init(GPIOD, &GPIO_InitStructure); GPIO_InitStructure.GPIO_Pin = GPIO_Pin_8 | GPIO_Pin_9 | GPIO_Pin_10 | GPIO_Pin_11 | GPIO_Pin_12 | GPIO_Pin_13 | GPIO_Pin_14 | GPIO_Pin_15; GPIO_Init(GPIOD, &GPIO_InitStructure); GPIO_InitStructure.GPIO_Pin = GPIO_Pin_6 | GPIO_Pin_7 | GPIO_Pin_8; GPIO_Init(GPIOC, &GPIO_InitStructure); /* NOE and NWE configuration */ GPIO_InitStructure.GPIO_Pin = GPIO_Pin_10 |GPIO_Pin_11; GPIO_Init(GPIOC, &GPIO_InitStructure); /* NE3 configuration */ GPIO_InitStructure.GPIO_Pin = GPIO_Pin_9; GPIO_Init(GPIOC, &GPIO_InitStructure); /* NBL0, NBL1 configuration */ GPIO_InitStructure.GPIO_Pin = GPIO_Pin_4 | GPIO_Pin_5; GPIO_Init(GPIOC, &GPIO_InitStructure);
RCC -> AHBENR |= 0x00000114; 使能FSMC时钟 /*-- FSMC Configuration ------------------------------------------------------ */ p.FSMC_AddressSetupTime = 2; p.FSMC_AddressHoldTime = 0; p.FSMC_DataSetupTime = 3; p.FSMC_BusTurnAroundDuration = 1; p.FSMC_CLKDivision = 0; p.FSMC_DataLatency = 0; p.FSMC_AccessMode = FSMC_AccessMode_A;
FSMC_NORSRAMInitStructure.FSMC_Bank = FSMC_Bank1_NORSRAM3; FSMC_NORSRAMInitStructure.FSMC_DataAddressMux = FSMC_DataAddressMux_Disable; //地址/数据不复用 FSMC_NORSRAMInitStructure.FSMC_MemoryType = FSMC_MemoryType_SRAM; //存储器类型 FSMC_NORSRAMInitStructure.FSMC_MemoryDataWidth = FSMC_MemoryDataWidth_16b; //数据宽度 FSMC_NORSRAMInitStructure.FSMC_BurstAccessMode = FSMC_BurstAccessMode_Disable; //成组模式访问 FSMC_NORSRAMInitStructure.FSMC_WaitSignalPolarity = FSMC_WaitSignalPolarity_Low; //等待信号极性 FSMC_NORSRAMInitStructure.FSMC_WrapMode = FSMC_WrapMode_Disable; //对齐成组模式 FSMC_NORSRAMInitStructure.FSMC_WaitSignalActive = FSMC_WaitSignalActive_BeforeWaitState; //配置等待时序 FSMC_NORSRAMInitStructure.FSMC_WriteOperation = FSMC_WriteOperation_Enable; //允许FSMC对存储器写操作 FSMC_NORSRAMInitStructure.FSMC_WaitSignal = FSMC_WaitSignal_Disable; //等待使能位 禁止 FSMC_NORSRAMInitStructure.FSMC_ExtendedMode = FSMC_ExtendedMode_Disable; //扩展模式选择 FSMC_NORSRAMInitStructure.FSMC_AsyncWait = FSMC_AsyncWait_Disable; // FSMC_NORSRAMInitStructure.FSMC_WriteBurst = FSMC_WriteBurst_Disable; //成组写使能选择 FSMC_NORSRAMInitStructure.FSMC_ReadWriteTimingStruct = &p; // FSMC_NORSRAMInitStructure.FSMC_WriteTimingStruct = &p; //
FSMC_NORSRAMInit(&FSMC_NORSRAMInitStructure);
/* Enable FSMC Bank1_SRAM Bank */ FSMC_NORSRAMCmd(FSMC_Bank1_NORSRAM3, ENABLE); }
写字节函数:
void FSMC_SRAM_WriteBuffer(u16* pBuffer, u32 WriteAddr, u32 NumHalfwordToWrite) { for(; NumHalfwordToWrite != 0; NumHalfwordToWrite--) /* while there is data to write */ { /* Transfer data to the memory */ *(u16 *) (Bank1_SRAM3_ADDR + WriteAddr) = *pBuffer++; /* Increment the address*/ WriteAddr += 2; } }
问题来了:我在仿真的时候观察地址中写入的数据时发现,一进入写字节函数0X68008000以后的地址全都是0x1FF0,

执行完 *(u16 *) (Bank1_SRAM3_ADDR + WriteAddr) = *pBuffer++;这条语句后, 0X68008000以后的地址全都被写入0x3212,

另外,再执行 for(; NumHalfwordToWrite != 0; NumHalfwordToWrite--) 时, 0X68008000以后的地址又全都写入0x1FF0, 导致最后读出的数据全是0X1FF0,看写字节函数中应该是1个字一个字写呀,为什么写完之后全被0x1FF0覆盖呀,求教,不胜感激
友情提示: 此问题已得到解决,问题已经关闭,关闭后问题禁止继续编辑,回答。
用144的多好,呵呵。
---------------------------------
你怎么接线的?
一周热门 更多>