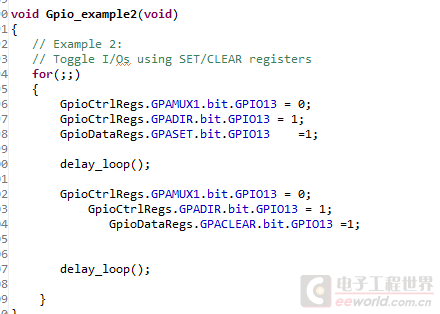
老师给了我个开发板和电路图,让我自学28335,马上要用,结果搞了半天小灯都跑不对,28335连着fpga,跑官方gpio例程,就是有example 123 那个,板子一连上fpga的灯不停闪,姑且不管,28335的13引脚连着小灯,运行后小灯有时闪有时不闪,完全是概率事件,如果改延函数为100万,小灯压根不闪,然后寄存器没法观察说没定义。。。debug优化选项我也关了啊,反正很诡异,不知道是硬件还是软件问题,求教啊,一个礼拜灯没跑好,也就是我了,太惨了


此帖出自小平头技术问答


友情提示: 此问题已得到解决,问题已经关闭,关闭后问题禁止继续编辑,回答。
设置的放在循环外。
还有,延迟函数到底有多久
你要试试能不能点亮有两种办法
调试时,一步一步跑(不过这个时候要把延迟注释掉)
第二,死循环前,只写高或者写低,看哪个灯会亮
硬件正常情况下,两者必有一个亮一个灭
// Select the example to compile in. Only one example should be set as 1
// the rest should be set as 0.
#define EXAMPLE1 0 // Use DATA registers to toggle I/O's
#define EXAMPLE2 1 // Use SET/CLEAR registers to toggle I/O's
#define EXAMPLE3 0 // Use TOGGLE registers to toggle I/O's
// Prototype statements for functions found within this file.
void delay_loop(void);
void Gpio_select(void);
void Gpio_example1(void);
void Gpio_example2(void);
void Gpio_example3(void);
void main(void)
{
EALLOW;
if(!(SysCtrlRegs.WDCR & 0x0080)) //check WDFLag
{
//Force a reset
//make sure WDog is enabled
//watch dog enable, and WDCHK value
SysCtrlRegs.WDCR = 0x00A8; //previous value of 0x0068
//would disable the WDog
//write invalid data forces reset
SysCtrlRegs.WDCR = 0x0000;
}
//Clear WDFlag - also need to write WDCHK correctly
SysCtrlRegs.WDCR = 0x00E8; //This will also disable the WDog
//SysCtrlRegs.WDCR = 0x00A8; //This will enable the WDog
EDIS;
// Step 1. Initialize System Control:
// PLL, WatchDog, enable Peripheral Clocks
// This example function is found in the DSP2833x_SysCtrl.c file.
InitSysCtrl();
// Step 2. Initalize GPIO:
// This example function is found in the DSP2833x_Gpio.c file and
// illustrates how to set the GPIO to it's default state.
// InitGpio(); // Skipped for this example
// For this example use the following configuration:
Gpio_select();
// Step 3. Clear all interrupts and initialize PIE vector table:
// Disable CPU interrupts
DINT;
// Initialize PIE control registers to their default state.
// The default state is all PIE interrupts disabled and flags
// are cleared.
// This function is found in the DSP2833x_PieCtrl.c file.
InitPieCtrl();
// Disable CPU interrupts and clear all CPU interrupt flags:
IER = 0x0000;
IFR = 0x0000;
// Initialize the PIE vector table with pointers to the shell Interrupt
// Service Routines (ISR).
// This will populate the entire table, even if the interrupt
// is not used in this example. This is useful for debug purposes.
// The shell ISR routines are found in DSP2833x_DefaultIsr.c.
// This function is found in DSP2833x_PieVect.c.
InitPieVectTable();
// Step 4. Initialize all the Device Peripherals:
// This function is found in DSP2833x_InitPeripherals.c
// InitPeripherals(); // Not required for this example
// Step 5. User specific code:
#if EXAMPLE1
// This example uses DATA registers to toggle I/O's
Gpio_example1();
#endif // - EXAMPLE1
#if EXAMPLE2
// This example uses SET/CLEAR registers to toggle I/O's
Gpio_example2();
#endif
#if EXAMPLE3
// This example uses TOGGLE registers to toggle I/O's
Gpio_example3();
#endif
}
void delay_loop()
{
volatile long i;
for (i = 0; i < 1000000; i++) {}
}
void Gpio_example1(void)
{
// Example 1:
// Toggle I/Os using DATA registers
for(;;)
{
GpioDataRegs.GPADAT.all =0xAAAAAAAA;
GpioDataRegs.GPBDAT.all =0x0000000A;
delay_loop();
GpioDataRegs.GPADAT.all =0x55555555;
GpioDataRegs.GPBDAT.all =0x00000005;
delay_loop();
}
}
void Gpio_example2(void)
{
// Example 2:
// Toggle I/Os using SET/CLEAR registers
for(;;)
{
GpioCtrlRegs.GPAMUX1.bit.GPIO13 = 0;
GpioCtrlRegs.GPADIR.bit.GPIO13 = 1;
GpioDataRegs.GPASET.bit.GPIO13 =1;
delay_loop();
GpioCtrlRegs.GPAMUX1.bit.GPIO13 = 0;
GpioCtrlRegs.GPADIR.bit.GPIO13 = 1;
GpioDataRegs.GPACLEAR.bit.GPIO13 =1;
delay_loop();
}
}
void Gpio_example3(void)
{
// Example 2:
// Toggle I/Os using TOGGLE registers
// Set pins to a known state
GpioDataRegs.GPASET.all =0xAAAAAAAA;
GpioDataRegs.GPACLEAR.all =0x55555555;
GpioDataRegs.GPBSET.all =0x0000000A;
GpioDataRegs.GPBCLEAR.all =0x00000005;
// Use TOGGLE registers to flip the state of
// the pins.
// Any bit set to a 1 will flip state (toggle)
// Any bit set to a 0 will not toggle.
for(;;)
{
GpioDataRegs.GPATOGGLE.all =0xFFFFFFFF;
GpioDataRegs.GPBTOGGLE.all =0x0000000F;
delay_loop();
}
}
void Gpio_select(void)
{
EALLOW;
GpioCtrlRegs.GPAMUX1.all = 0x00000000; // All GPIO
GpioCtrlRegs.GPAMUX2.all = 0x00000000; // All GPIO
GpioCtrlRegs.GPAMUX1.all = 0x00000000; // All GPIO
GpioCtrlRegs.GPADIR.all = 0xFFFFFFFF; // All outputs
GpioCtrlRegs.GPBDIR.all = 0x0000000F; // All outputs
EDIS;
} 非常感谢您的回答!
一周热门 更多>