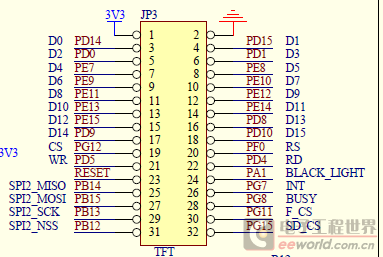
开发板:红牛开发板REV 1.0
芯片:STM32F103ZET6
LCD屏:3.2寸

接口:FSMC数据口,RS接PF0(A0),CS接PG12(NE4)
/* 以下按照对原子教程举例A10 7FE A6 7E的理解,认为A0应该这么写0X00000000 */
typedef struct
{
vu16 LCD_REG;
vu16 LCD_RAM;
} LCD_TypeDef;
/* Note: LCD /RS is CE4 - Bank 4 of NOR/SRAM Bank 1~4 */
#define LCD_BASE ((u32)(0x6C000000 | 0x00000000))
#define LCD ((LCD_TypeDef *) LCD_BASE)
CTRL LINE方面配置,是照附送例程抄过来的,其中PE6多出来,不明白其用途,以及BACKLIGHT(PA1)未配置
void LCD_CtrlLinesConfig(void)
{
GPIO_InitTypeDef GPIO_InitStructure;
/* Enable FSMC, GPIOD, GPIOE, GPIOF, GPIOG and AFIO clocks */
RCC_AHBPeriphClockCmd(RCC_AHBPeriph_FSMC, ENABLE);
RCC_APB2PeriphClockCmd(RCC_APB2Periph_GPIOD | RCC_APB2Periph_GPIOE |
RCC_APB2Periph_GPIOF | RCC_APB2Periph_GPIOG |
RCC_APB2Periph_AFIO, ENABLE);
/* Set PD.00(D2), PD.01(D3), PD.04(NOE), PD.05(NWE), PD.08(D13), PD.09(D14),
PD.10(D15), PD.14(D0), PD.15(D1) as alternate
function push pull */
GPIO_InitStructure.GPIO_Pin = GPIO_Pin_0 | GPIO_Pin_1 | GPIO_Pin_4 | GPIO_Pin_5 |
GPIO_Pin_8 | GPIO_Pin_9 | GPIO_Pin_10 | GPIO_Pin_14 |
GPIO_Pin_15;
GPIO_InitStructure.GPIO_Speed = GPIO_Speed_50MHz;
GPIO_InitStructure.GPIO_Mode = GPIO_Mode_AF_PP;
GPIO_Init(GPIOD, &GPIO_InitStructure);
/* Set PE.07(D4), PE.08(D5), PE.09(D6), PE.10(D7), PE.11(D8), PE.12(D9), PE.13(D10),
PE.14(D11), PE.15(D12) as alternate function push pull */
GPIO_InitStructure.GPIO_Pin = GPIO_Pin_6 | GPIO_Pin_7 | GPIO_Pin_8 | GPIO_Pin_9 | GPIO_Pin_10 |
GPIO_Pin_11 | GPIO_Pin_12 | GPIO_Pin_13 | GPIO_Pin_14 |
GPIO_Pin_15;
GPIO_InitStructure.GPIO_Speed = GPIO_Speed_50MHz;
GPIO_InitStructure.GPIO_Mode = GPIO_Mode_AF_PP;
GPIO_Init(GPIOE, &GPIO_InitStructure);
GPIO_WriteBit(GPIOE, GPIO_Pin_6, Bit_SET);
/* Set PF.00(A0 (RS)) as alternate function push pull */
GPIO_InitStructure.GPIO_Pin = GPIO_Pin_0;
GPIO_InitStructure.GPIO_Speed = GPIO_Speed_50MHz;
GPIO_InitStructure.GPIO_Mode = GPIO_Mode_AF_PP;
GPIO_Init(GPIOF, &GPIO_InitStructure);
/* Set PG.12(NE4 (LCD/CS)) as alternate function push pull - CE3(LCD /CS) */
GPIO_InitStructure.GPIO_Pin = GPIO_Pin_12;
GPIO_InitStructure.GPIO_Speed = GPIO_Speed_50MHz;
GPIO_InitStructure.GPIO_Mode = GPIO_Mode_AF_PP;
GPIO_Init(GPIOG, &GPIO_InitStructure);
}
int main(void)
{
SystemInit();
RCC_APB2PeriphClockCmd(RCC_APB2Periph_USART1 | RCC_APB2Periph_GPIOC | RCC_APB2Periph_GPIOF | RCC_APB2Periph_GPIOA, ENABLE);
GPIO_Configuration();
SysTick_Config(72000);
STM3210E_LCD_Init(); //内含附送的LCD初始化,但未标明型号
// while(1)
// {
// GPIO_SetBits(GPIOA , GPIO_Pin_1);
// LCD_Clear(Blue); //CLEAR失败
// Delay(1000);
// LCD_Clear(Magenta); //CLEAR失败
// Delay(1000);
// LCD_Clear(Red); //CLEAR失败
// Delay(1000);
// }
GPIO_SetBits(GPIOF , GPIO_Pin_6 | GPIO_Pin_7 | GPIO_Pin_8);
LCD_WriteReg(0x0000, 0x0001);
Delay(100);
DeviceCode = LCD_ReadReg(0x0000); //读取ID失败
USART_SendData(USART1, DeviceCode);
Delay(1000);
// }
}
实在没办法,把附送的例程原封不动下进去,结果还是不行
其中LCD的地址设置有所差异
typedef struct
{
vu16 LCD_REG;
vu16 LCD_RAM;
} LCD_TypeDef;
/* LCD is connected to the FSMC_Bank1_NOR/SRAM4 and NE4 is used as ship select signal */
#define LCD_BASE ((u32)(0x60000000 | 0x0C000000))
#define LCD ((LCD_TypeDef *) LCD_BASE)
STLINK调试,LCD不亮

下好程序接电源,仅亮背光

目前不知道是否屏子坏了或是程序的问题(板上没有亮度对比度的可调电阻,软件控制BACKLIGHT正常)
此帖出自小平头技术问答
芯片:STM32F103ZET6
LCD屏:3.2寸

接口:FSMC数据口,RS接PF0(A0),CS接PG12(NE4)
/* 以下按照对原子教程举例A10 7FE A6 7E的理解,认为A0应该这么写0X00000000 */
typedef struct
{
vu16 LCD_REG;
vu16 LCD_RAM;
} LCD_TypeDef;
/* Note: LCD /RS is CE4 - Bank 4 of NOR/SRAM Bank 1~4 */
#define LCD_BASE ((u32)(0x6C000000 | 0x00000000))
#define LCD ((LCD_TypeDef *) LCD_BASE)
CTRL LINE方面配置,是照附送例程抄过来的,其中PE6多出来,不明白其用途,以及BACKLIGHT(PA1)未配置
void LCD_CtrlLinesConfig(void)
{
GPIO_InitTypeDef GPIO_InitStructure;
/* Enable FSMC, GPIOD, GPIOE, GPIOF, GPIOG and AFIO clocks */
RCC_AHBPeriphClockCmd(RCC_AHBPeriph_FSMC, ENABLE);
RCC_APB2PeriphClockCmd(RCC_APB2Periph_GPIOD | RCC_APB2Periph_GPIOE |
RCC_APB2Periph_GPIOF | RCC_APB2Periph_GPIOG |
RCC_APB2Periph_AFIO, ENABLE);
/* Set PD.00(D2), PD.01(D3), PD.04(NOE), PD.05(NWE), PD.08(D13), PD.09(D14),
PD.10(D15), PD.14(D0), PD.15(D1) as alternate
function push pull */
GPIO_InitStructure.GPIO_Pin = GPIO_Pin_0 | GPIO_Pin_1 | GPIO_Pin_4 | GPIO_Pin_5 |
GPIO_Pin_8 | GPIO_Pin_9 | GPIO_Pin_10 | GPIO_Pin_14 |
GPIO_Pin_15;
GPIO_InitStructure.GPIO_Speed = GPIO_Speed_50MHz;
GPIO_InitStructure.GPIO_Mode = GPIO_Mode_AF_PP;
GPIO_Init(GPIOD, &GPIO_InitStructure);
/* Set PE.07(D4), PE.08(D5), PE.09(D6), PE.10(D7), PE.11(D8), PE.12(D9), PE.13(D10),
PE.14(D11), PE.15(D12) as alternate function push pull */
GPIO_InitStructure.GPIO_Pin = GPIO_Pin_6 | GPIO_Pin_7 | GPIO_Pin_8 | GPIO_Pin_9 | GPIO_Pin_10 |
GPIO_Pin_11 | GPIO_Pin_12 | GPIO_Pin_13 | GPIO_Pin_14 |
GPIO_Pin_15;
GPIO_InitStructure.GPIO_Speed = GPIO_Speed_50MHz;
GPIO_InitStructure.GPIO_Mode = GPIO_Mode_AF_PP;
GPIO_Init(GPIOE, &GPIO_InitStructure);
GPIO_WriteBit(GPIOE, GPIO_Pin_6, Bit_SET);
/* Set PF.00(A0 (RS)) as alternate function push pull */
GPIO_InitStructure.GPIO_Pin = GPIO_Pin_0;
GPIO_InitStructure.GPIO_Speed = GPIO_Speed_50MHz;
GPIO_InitStructure.GPIO_Mode = GPIO_Mode_AF_PP;
GPIO_Init(GPIOF, &GPIO_InitStructure);
/* Set PG.12(NE4 (LCD/CS)) as alternate function push pull - CE3(LCD /CS) */
GPIO_InitStructure.GPIO_Pin = GPIO_Pin_12;
GPIO_InitStructure.GPIO_Speed = GPIO_Speed_50MHz;
GPIO_InitStructure.GPIO_Mode = GPIO_Mode_AF_PP;
GPIO_Init(GPIOG, &GPIO_InitStructure);
}
int main(void)
{
SystemInit();
RCC_APB2PeriphClockCmd(RCC_APB2Periph_USART1 | RCC_APB2Periph_GPIOC | RCC_APB2Periph_GPIOF | RCC_APB2Periph_GPIOA, ENABLE);
GPIO_Configuration();
SysTick_Config(72000);
STM3210E_LCD_Init(); //内含附送的LCD初始化,但未标明型号
// while(1)
// {
// GPIO_SetBits(GPIOA , GPIO_Pin_1);
// LCD_Clear(Blue); //CLEAR失败
// Delay(1000);
// LCD_Clear(Magenta); //CLEAR失败
// Delay(1000);
// LCD_Clear(Red); //CLEAR失败
// Delay(1000);
// }
GPIO_SetBits(GPIOF , GPIO_Pin_6 | GPIO_Pin_7 | GPIO_Pin_8);
LCD_WriteReg(0x0000, 0x0001);
Delay(100);
DeviceCode = LCD_ReadReg(0x0000); //读取ID失败
USART_SendData(USART1, DeviceCode);
Delay(1000);
// }
}
实在没办法,把附送的例程原封不动下进去,结果还是不行
其中LCD的地址设置有所差异
typedef struct
{
vu16 LCD_REG;
vu16 LCD_RAM;
} LCD_TypeDef;
/* LCD is connected to the FSMC_Bank1_NOR/SRAM4 and NE4 is used as ship select signal */
#define LCD_BASE ((u32)(0x60000000 | 0x0C000000))
#define LCD ((LCD_TypeDef *) LCD_BASE)
STLINK调试,LCD不亮

下好程序接电源,仅亮背光

目前不知道是否屏子坏了或是程序的问题(板上没有亮度对比度的可调电阻,软件控制BACKLIGHT正常)
此帖出自小平头技术问答
友情提示: 此问题已得到解决,问题已经关闭,关闭后问题禁止继续编辑,回答。
Reset和板子的Reset接一起的
那对TFT还有很大一段初始化代码呀。
ID读不到,你应该手动指定某个型号ID进行初始化。不行再换一个ID。但是背光一定要先亮起来呀。
一周热门 更多>